Select to expand quoteBushdog said..
I replace the Phillips heads on raw water pumps with small (6mm?) bolts. Much easier to slide a ring spanner over em and loosen it. Just be extra careful not to over tighten them when putting it all back together.
Excellent advice there Bushdog.![]()
Select to expand quoteDonk107 said..
On the pump on my Yanmar I replaced the Phillips head screws with stainless socket head screws as they will not strip the head when undoing and replacing and will sit on the bit when replacing
Regards Don

Also excellent advice.
Thanks for the suggestions about replacing the screws with bolts. The cause of my problem was not just the screws but my crappy screwdriver, and fumbling around trying to find holes that were not there.
Anyway, an update. I noticed a tiny drip from the fuel filter overnight, so, yesterday, I decided to take it off, clean the gaskets and re-seat it. This, apparently insignificant, act was enough to make the engine refuse to start up. It would turn over, but not fire. More bad language.
Today I returned to do battle with the engine with better weapons. Got the batteries fully charged and took stuff apart, cleaned it and put it back together. It seems easy according to the Bukh book, but the photos in the book show nice all-round access, not the actual gaps on the boat that are just big enough to get one hand into. I took apart and re-assembled the water separator, which was probably unnecessary because I found a drain plug on its underside. I took apart the fuel lines I could reach, and the rocker cover to check that the valves were opening and closing. Finally, I bled the system several times using the air purge screw, which is messy because the diesel simply dribbles out into the bilge, or into my paint tray under the engine. After yet more coaxing, it finally fired up, stuttered, recovered and eventually ran smoothly. Some good language and Hallelujahs, for a change. I stopped and started it again, to make sure. There was plenty of water coming out of the exhaust.
Its probably air in the fuel lines, so I will think further about the suggestion of a squeezy fuel bulb to prime the fuel lines after a filter change. However, I'm a little nervous about changing something, now. Also, the air purge screw is your friend, even though you can only find it with a torch and a guide book, and the excess fuel just dribbles onto the floor. One good thing the previous owner did, was to install the fuel tank at a high level, just under the port seat in the cockpit, so that whatever happens to the fuel lift pump, gravity is on my side.
I still do not know what the dangling wire is supposed to do. It has three terminals, and my best guess is that it attaches to the exposed lug, which is an oil pressure warning gauge.
I now know more about Bukh Diesel engines than previously.
The good news is, I can go sailing again.
Select to expand quoteAchernar said..
Its probably air in the fuel lines, so I will think further about the suggestion of a squeezy fuel bulb to prime the fuel lines after a filter change. However, I'm a little nervous about changing something
The good news is, I can go sailing again.
Sounds suspiciously like you have a CAV type water separator. The gaskets are hard to line up perfectly unless you have really good access. The Ryco unit is a far superior product that is impossible to screw up. Go crazy and spend $15 on an electric fuel pump and just jumper it for bleeding.
Want a good reliable fuel filter?
Go down to a truck wrecker's and get yourself one from a (small) Japanese diesel truck or van.
They will mostly be Denso.
Filters readily available too. Not from the wrecker though.
gary
Installed a cut in/cut out switch for my 12v hot water element. Since installing the extra solar panels I now have a lot of excess power so my idea was to have the 12v HWS turn on when the batteries are plenty charged (13.6v) & turn off when they get down a bit (12.7v which is still fully charged). I thought this would kick in & out throughout the day & keep the water warm but after hooking it up today & running it for a couple of hours the water is up to max temperature!! So now I have to wire in another temp controller so that it doesn't overheat!! To say that I am pleased with performance of the little 12v heating element is an understatement!!
I just happened to have a spare 12v temp controller on board so now I can wire this in so that the 12v hot water element will cut out when max temp is reached - the same as the 240v system. I should now have permanent hot water!!


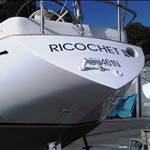
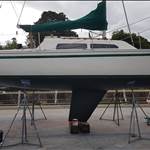
Ripping off the teak deck on Ricochet 2.
Working up the starboard side just ahead of the shrouds now. The last hole in the lhs of the photo and the interior will be watertight again. Portside is done and just one more decent size bit of ply to go down in the photo area on the left. Pretty much all the work is done from the workboat and that has been very trying lately with all the holiday traffic screaming past making lots of wake. Forward of the mast the deck camber is a bit easier to work on. Alongside the cabin, the deck camber and the slippery surface of the Baltic Birch ply makes it impossible to stay in position without a toe rail.
The purpose of posting the photo is to show what caused all this drama in the first place. The first sheet of ply, looks like 7mm Mahogany was laid down with epoxy glue. The second layer of possibly the same ply was laid down with epoxy glue and stapled in place. A spreader was used, the grooves are clearly visible in the left of the photo. The problem was not enough pressure was exerted by the staples and this is a poor join. Some other parts are worst than what is shown here. Then the teak was laid in epoxy and monel nailed at 45 degrees in the edge of the teak into the first layer of ply. Add in some neglect of the teak seams and water has rotted out sections of the top ply. At the stanchion bases and the toerail there is no mastic and water has obviously entered here as well. On the outer edge of the toe rail there was a gap of about 3mm where seawater would have been forced up and there was not much there to protect the edge grain of the ply! SS34's are wet boats and there would have been plenty of water both sides of the toerail. The major damage though would have been from rainwater. Rainwater seeping through the teak seams, through the top ply and most of it running along the epoxy coated surface of the bottom ply.
The toe rail and stanchions have obviously been off before as they are in slightly different spots. The holes filled with epoxy.

Select to expand quoteRamona said..
Ripping off the teak deck on Ricochet 2.
Working up the starboard side just ahead of the shrouds now. The last hole in the lhs of the photo and the interior will be watertight again. Portside is done and just one more decent size bit of ply to go down in the photo area on the left. Pretty much all the work is done from the workboat and that has been very trying lately with all the holiday traffic screaming past making lots of wake. Forward of the mast the deck camber is a bit easier to work on. Alongside the cabin, the deck camber and the slippery surface of the Baltic Birch ply makes it impossible to stay in position without a toe rail.
The purpose of posting the photo is to show what caused all this drama in the first place. The first sheet of ply, looks like 7mm Mahogany was laid down with epoxy glue. The second layer of possibly the same ply was laid down with epoxy glue and stapled in place. A spreader was used, the grooves are clearly visible in the left of the photo. The problem was not enough pressure was exerted by the staples and this is a poor join. Some other parts are worst than what is shown here. Then the teak was laid in epoxy and monel nailed at 45 degrees in the edge of the teak into the first layer of ply. Add in some neglect of the teak seams and water has rotted out sections of the top ply. At the stanchion bases and the toerail there is no mastic and water has obviously entered here as well. On the outer edge of the toe rail there was a gap of about 3mm where seawater would have been forced up and there was not much there to protect the edge grain of the ply! SS34's are wet boats and there would have been plenty of water both sides of the toerail. The major damage though would have been from rainwater. Rainwater seeping through the teak seams, through the top ply and most of it running along the epoxy coated surface of the bottom ply.
The toe rail and stanchions have obviously been off before as they are in slightly different spots. The holes filled with epoxy.
Hi Ramona
Very interesting. Could you just refresh my memory. Is your boat in or out of the water?
Select to expand quoteBundeenabuoy said..
Hi Ramona
Very interesting. Could you just refresh my memory. Is your boat in or out of the water?
It's at her mooring in the river at Greenwell Point.Strong tidal estuary which lately has been plagued with weird weather with unseasonable weather with annoying amounts of rain. Lots of holidaymakers, a mixture of casual fishers and serious marlin fishers blasting past at regular intervals. Thankfully they are thinning out now. I'm working 6 days a week on the job.
Well as a lot of jobs on our boats start out it got bigger and before you know I rewired the boat.
It started as a small job to relocate the batteries so you can actually get at them. It took about 4 full days all up. It was the typical 30 something year old yacht with bits and pieces added and removed over the years. Unidentified non colour coded wires going every where. After a lot of careful detective work and elimination I had identified all circuits and labelled them. Then the point of no return. Start cutting and removing ![]() . I used Blue Sea System products and quality tinned cable and quality heat shrink.
. I used Blue Sea System products and quality tinned cable and quality heat shrink.
I now have two batteries, Battery Isolator/selector switch, VSR, small solar panel for trickle charging when away from the boat and two x six switch fused switch boards.
The moment of truth came the other day. Engine started, no smoke or flames, and every circuit works ![]() .
.

Before I pulled it all out

Nearly there

I now know where every wire goes and what it does. I have spare capacity for three more circuits for future additions.
Oh and I installed a new Lowrance Chartplotter Sounder.
Pretty satisfying to do it yourself. In the next few weeks I'll turn the sketches into proper wiring diagrams.
The batteries installation is not complete in the photo above and apologies for the upside down pics.
Select to expand quotetroubadour said..
Well as a lot of jobs on our boats start out it got bigger and before you know I rewired the boat.
It started as a small job to relocate the batteries so you can actually get at them. It took about 4 full days all up. It was the typical 30 something year old yacht with bits and pieces added and removed over the years. Unidentified non colour coded wires going every where. After a lot of careful detective work and elimination I had identified all circuits and labelled them. Then the point of no return. Start cutting and removing ![]() . I used Blue Sea System products and quality tinned cable and quality heat shrink.
. I used Blue Sea System products and quality tinned cable and quality heat shrink.
I now have two batteries, Battery Isolator/selector switch, VSR, small solar panel for trickle charging when away from the boat and two x six switch fused switch boards.
The moment of truth came the other day. Engine started, no smoke or flames, and every circuit works ![]() .
.
Before I pulled it all out
Nearly there
I now know where every wire goes and what it does. I have spare capacity for three more circuits for future additions.
Oh and I installed a new Lowrance Chartplotter Sounder.
Pretty satisfying to do it yourself. In the next few weeks I'll turn the sketches into proper wiring diagrams.
The batteries installation is not complete in the photo above and apologies for the upside down pics.
Well done Troubadour.
How satisfying!
Select to expand quoteLazzz said..
Installed a cut in/cut out switch for my 12v hot water element. Since installing the extra solar panels I now have a lot of excess power so my idea was to have the 12v HWS turn on when the batteries are plenty charged (13.6v) & turn off when they get down a bit (12.7v which is still fully charged). I thought this would kick in & out throughout the day & keep the water warm but after hooking it up today & running it for a couple of hours the water is up to max temperature!! So now I have to wire in another temp controller so that it doesn't overheat!! To say that I am pleased with performance of the little 12v heating element is an understatement!!
I just happened to have a spare 12v temp controller on board so now I can wire this in so that the 12v hot water element will cut out when max temp is reached - the same as the 240v system. I should now have permanent hot water!!
Great job!
I realize the battery installation is not complete but please ensure the batteries end up firmly secured. They should really be in a box clamped down and with a cover over the top and plenty of ventilation.
Select to expand quoteRamona said..
I realize the battery installation is not complete but please ensure the batteries end up firmly secured. They should really be in a box clamped down and with a cover over the top and plenty of ventilation.
Yep batteries are now secured in spill proof box. I've been on inverted yachts
Select to expand quoteRamona said..
Ripping off the teak deck on Ricochet 2.
Working up the starboard side just ahead of the shrouds now. The last hole in the lhs of the photo and the interior will be watertight again. Portside is done and just one more decent size bit of ply to go down in the photo area on the left. Pretty much all the work is done from the workboat and that has been very trying lately with all the holiday traffic screaming past making lots of wake. Forward of the mast the deck camber is a bit easier to work on. Alongside the cabin, the deck camber and the slippery surface of the Baltic Birch ply makes it impossible to stay in position without a toe rail.
The purpose of posting the photo is to show what caused all this drama in the first place. The first sheet of ply, looks like 7mm Mahogany was laid down with epoxy glue. The second layer of possibly the same ply was laid down with epoxy glue and stapled in place. A spreader was used, the grooves are clearly visible in the left of the photo. The problem was not enough pressure was exerted by the staples and this is a poor join. Some other parts are worst than what is shown here. Then the teak was laid in epoxy and monel nailed at 45 degrees in the edge of the teak into the first layer of ply. Add in some neglect of the teak seams and water has rotted out sections of the top ply. At the stanchion bases and the toerail there is no mastic and water has obviously entered here as well. On the outer edge of the toe rail there was a gap of about 3mm where seawater would have been forced up and there was not much there to protect the edge grain of the ply! SS34's are wet boats and there would have been plenty of water both sides of the toerail. The major damage though would have been from rainwater. Rainwater seeping through the teak seams, through the top ply and most of it running along the epoxy coated surface of the bottom ply.
The toe rail and stanchions have obviously been off before as they are in slightly different spots. The holes filled with epoxy.
That is a great job you are doing. It will be an excellent boat when you have finished.
Had the rigging inspected by professionals, their approach is unconventional but very entertaining ![]() .
.
infamous.net.au/

Extreeemly happy with 12v hot water system!!
Still getting 4 amps charging even though the hot water is heating (51 at the moment), as well as radio, fans etc running!! Fridge & freezer are running as well but not kicked in at the moment.

Also finished my hot water circulating system.
This little light thingy is a timer hooked up to switch which, when activated, runs a little pump to circulate the hot water for 40 seconds. This heats the water near the taps/shower so that I don't have to run cold water down the drain waiting for the hot!!
It's hot almost instantly!! ![]()

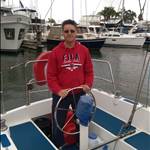
Winches.
First i removed the (not being used) reefing winch from the mast and relocated it to the cabin top, so now i can comfortably reef and outhaul from the cockpit. Then i decided to give it a service - something i had never done before, so was a bit apprehensive. Turned out to be pretty straightforward, so l i did the other side (halyard winch) as well. VERY pleased with the difference in performance, so now im feeling sort of ok about doing the sheet winches. Being 2spd self tailing as opposed to the smaller single spd ones i just did, is there anything special i need to know or look out for?? Any advice would be appreciated. Thanks
Select to expand quoteAzure305 said..
Winches.
First i removed the (not being used) reefing winch from the mast and relocated it to the cabin top, so now i can comfortably reef and outhaul from the cockpit. Then i decided to give it a service - something i had never done before, so was a bit apprehensive. Turned out to be pretty straightforward, so l i did the other side (halyard winch) as well. VERY pleased with the difference in performance, so now im feeling sort of ok about doing the sheet winches. Being 2spd self tailing as opposed to the smaller single spd ones i just did, is there anything special i need to know or look out for?? Any advice would be appreciated. Thanks
Just another couple of cogs nothing special ![]() we should catch up soon.
we should catch up soon.
Select to expand quoteAzure305 said..
Winches.
First i removed the (not being used) reefing winch from the mast and relocated it to the cabin top, so now i can comfortably reef and outhaul from the cockpit. Then i decided to give it a service - something i had never done before, so was a bit apprehensive. Turned out to be pretty straightforward, so l i did the other side (halyard winch) as well. VERY pleased with the difference in performance, so now im feeling sort of ok about doing the sheet winches. Being 2spd self tailing as opposed to the smaller single spd ones i just did, is there anything special i need to know or look out for?? Any advice would be appreciated. Thanks
The sheet winches are just a bit closer to the edge! Make sure you take precautions on losing parts over the side.
Select to expand quoteRamona said..Azure305 said..
Winches.
First i removed the (not being used) reefing winch from the mast and relocated it to the cabin top, so now i can comfortably reef and outhaul from the cockpit. Then i decided to give it a service - something i had never done before, so was a bit apprehensive. Turned out to be pretty straightforward, so l i did the other side (halyard winch) as well. VERY pleased with the difference in performance, so now im feeling sort of ok about doing the sheet winches. Being 2spd self tailing as opposed to the smaller single spd ones i just did, is there anything special i need to know or look out for?? Any advice would be appreciated. Thanks
The sheet winches are just a bit closer to the edge! Make sure you take precautions on losing parts over the side.
Yes. Put up a barrier to stop springs flying over and parts rolling off ![]()
One trick for keeping winch parts on board is to get a largish cardboard box.
Cut a hole in the bottom which is the same diameter as the winch base and lower it over the winch.
This will keep any parts that slip out and keep the cockpit sides a little cleaner,
Gary
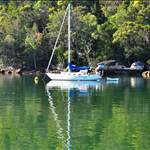
Just a quick photo to show the deck camber on Ricochet at the cabin. Headsail sheet track gives a bit of grip when it's there. Plywood has weathered a bit now and provides some grip on Crocs!

I removed the four clears today.
A big thankyou to Saltiest1 for his advice.

The front starboard clear removed.

All clears removed
Select to expand quoteAzure305 said..
Winches.
First i removed the (not being used) reefing winch from the mast and relocated it to the cabin top, so now i can comfortably reef and outhaul from the cockpit. Then i decided to give it a service - something i had never done before, so was a bit apprehensive. Turned out to be pretty straightforward, so l i did the other side (halyard winch) as well. VERY pleased with the difference in performance, so now im feeling sort of ok about doing the sheet winches. Being 2spd self tailing as opposed to the smaller single spd ones i just did, is there anything special i need to know or look out for?? Any advice would be appreciated. Thanks
Check the pawls and springs, but do not grease these parts, just oil. I use a mix of oil and grease to get a nice thin grease for the large roller bearings, makes the winch spin up nicely!