the 7000 looks lovely. I am surprised the difference between that and 1200 is so apparent
Select to expand quoteWindxtasy said..
the 7000 looks lovely. I am surprised the difference between that and 1200 is so apparent
Agreed! There should also be a gratuitous lawn photo in the mix as well so we can pass comment on its thatch quality as well.... In the meantime, hurry up and fry that fin Flex!
On another note - what happens if you someone 'Hides' you on your own thread? Does the original post and all the OPer's responses disappear? ![]()
![]()
you can see my lawn with FF22 1 year ago on page 13..will post result tomorrow of both same lawn and FF18.. This ain't your normal lawn and FF18 will be different colour! (no clue what you are going on about with other comment)
Very curious ....... about your non normal lawn .
Also interested in how the plating stops corrosion.
Good stuff guys ![]()
In my mind the anodising is supposed to do two things, First to increase the natural Aluminium Oxide layer thickness to improve longevity/resistance to abrasion...the Fangy fins are designed to live in weed and this increases wear significantly. To what extent I have no clue.
Second, to make it look better. If it looks fast, it will be fast, if only psychologically, it all helps. I'm sure there was a thread here about mindset...if you think you have the best gear you can own (even if its crap) and a winning attitude you will do way better than wishing you had better stuff/wind, something along those lines at least.
So far I've established the surface finish of these things is arbitrary, I've finished Fangy's fins to a dodgy 80grit flapper disk finish and I can sail upwind better than most with that (that pesky Slowboat is better) and the other 2 finished at best a dodgy 240. My fav 22 which is only one finished to polish (but I'm sure the actual surface roughness is way lower) but I can still beat most upwind. (I am not fast though) End story, surface finish is about how good it looks and longevity.
Thirdly (although there was only two), dying the anodised layer shows how this extra step of armour protection is holding up. The dye is held only in the anodised layer so if the colour goes you know the armour has gone so can choose to re anodise/buy new fin/do something else.
So this morning I re-sanded each side to their respective grits (left 1200, right 7000) to ensure removal of oxide layer and finish is definitely at that grit level. Pressure wash, soap wash then caustic bath....I was reluctant to go too long in the caustic but this turned out to be a mistake, sure looked like enough though....(remind to self for next fin: Need to keep in the caustic bath until grey goo is all over fin).
Hit it with hot soapy water again then straight to ano tank. This time I lost amps (down to 0.4) after 10 mins but a quick tightening of the Al wires sorted that and was back to 16+ amps at around 12.5 volts.
Acid was turning black again which is sure sign of not keeping in caustic soda bath long enough. (shoulda watched my own video on that for how long to leave it!) Made the call to carry on versus restart back in caustic bath.
Anodised for roughy 1 1/2 hrs which was roughly my camp battery (2) capacity at 16+ amps..current seemed to be increasing through process but need to review time lapse to check.
Out of ano tank into water...There was a LOT of black crud still. ..this time scrubbed all the black crud off then straight to dye tank. However the grain structure of the Al was awesome. The 1200 grid side looked better than the 7000 side at this stage.
This time as dye I tried turmeric. The reasons being it dyes the hell out of stainless/glass/fingers/anything if you cook with it and the stain colour is actually a very nice yellow. It is also extremely cheap (500g for $9aud at the Indian grocer which will do most households for a lifetime). Thanks to this supply chain shortage the conventional fabric dye's weren't available (wasn't even available before the shortage, so 2nd message to self is order some online). I really wanted blue/green dye but haven't seen this on the shelves since this covid madness started.
I held the fin in the turmeric bath for a good 2 hrs (agitating and checking every 15 mins or so) and it came out a very nice pale yellow (3rd pic). I decided the yellow colour wasn't deep enough (probably could have left it overnight to get better) so instead of steaming the fin I boiled it in a full turmeric solution for a solid hour.
Crikey, colour changed from nice yellow I was expecting to a full on orange. Started cleaning with water, rub, hot soapy water, iso alcohol, rub, soap water, rub etc etc...still colour kept coming off with rub so I think the final colour will be somewhere around the first pic
Photos 1&2 somewhere in the process, probably just before drop in dye solution.
#3 1200 Grit after soak in turmeric for 2hrs at 30-34degc
#4 7000 grit after soak in turmeric for 2hrs at 30-34degc
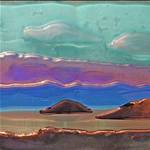
#5 1200 grit after boiled in turmeric for 1+ hr (on non normal lawn thatch)
#6 7000 grit after boiled in turmeric for 1+hr (on non normal lawn thatch) - weird water mark seems to be finger print/will go away
#7 perspective showing non normal lawn thatch (look hard at top left corner near pizza oven), bonus stuff for Imax1 right at the bottom since asked)
#8/9 in artificial light (you can work out which, right side forwards of fin was 7000 grit finish). I think the 1200 finish looks better but is it just the grain structure or something else
Don't know about you but I'm truly lov'n the grain structure of the fin coming through. The non uniformity of finish could be me or could be the cast. Also, there is almost NO SIGN of the porosity, its still there if you look hard, but not pronounced like in previous attempt. One thing for sure I'm guessing each Fangy fin has a signature like a finger print.
Next up the FF28..then the skunkworks fin!


Off topic but for Imax1, since you asked: The "lawn" is, at least as far as I am aware, the worlds "first" and "only" aquaponic lawn. I made it because I was sick of watering the lawn/fixing Retic and pretty much throwing money away and especially during Perths super hot 40+ deg days. Essentially water recycles from a 5000 litre fish tank to a gravel bed under the grass. Grass cleans water and grows....well grows like grass on steroids, and water is cleaned and returns to fish. Fish eaten by me, Solar powered, sun comes up, pumps turn on. Even if pumps fail, grass has a few weeks water 'reservoir' to stay alive. Fish in this case are silver perch which seem to be almost indestructible.
If you are really bored you can see an overview of system here:-
Bloody hell , that is impressive . I'm worried what your not showing us what's in your basement . When I zoom in on the fin pic with your garage shelves in the background , im sure I'm looking at parts to make a "Death Ray" . Is that an "intergalactic space modulator " in those green baskets ? I never knew Bunnings sold fusion material .With that kind of brain power your only one step away from becoming a super villain . "Evil Dr Turf "![]()
Nice lawn ![]()
Imax1, damm, this is what happens if you get the wife to take the photo (I was holding GoPro and fin and was running out of hands)....didn't realise I was showing some five finger discount Bunnings baskets... I just walked out of the store without thinking (honest)...probably should return them. If you must know the parts in the boxes are mainly the useful bits out of failed equipment, stepper motors, valves, gears, pipe offcuts etc. I think the part you might be mistaking for a Fusion drive is actually a 1KW battery inverter which I used to power a portable smoke machine to simulate cold gas thrusters on my full sized Tesla Cybertruck which you can see on the right in photo. This was a popular feature with the kids in last years Christmas lights display. The truck is getting a bit long in the tooth and been ordered out by wifey..all this anodising is putting off the sad day. It does take up a fair chunk of my shed so it needs to move on to allow for more project. I have no interest in fusion but I am playing around with some fission stuff.
To keep/get this back on topic, the plan for today is pressure blast the hell out of the FF18 to try and get rid of dirty orange colour which I think is above the anodised layer and bring out the yellow. (unlikely to get real world sailing with this any time soon) Also start prepping/anodising the FF28 as Fangy has confirmed I might get my hands on his latest skunkworks fin as early as tomorrow which will help delay all those less rewarding chores.
an update re anodising the FF28.
The FF28 is a whole different beast. Its much bigger than you may think. This creates a whole pile of issues if you are trying to anodise it. First...it takes a long time to try and get the finish down to 1200 on this much metal (admittedly my fin is battle hardened and well damaged so the process took longer than from raw)
Next up, the anodising tank. Do you think anyone sells a 20 litre plastic tank that fits a FF28? My 22 Litre plastic jerry can gets damm close but the nose of fin will literally be poking out at meniscus height...plus I only have around 19 litres of acid now thanks to previous contamination. Really don't want to buy more acid for a limited use case.
Was going to build a wooden box and line it with a good plastic bag like when I remembered I had some Poly carb offcuts I'd scored which was planned for the fin hydro test tank (back burner project). Will be interesting to at least see the fin during anodising (lead sheets hide most of the action though) and would be a good test of making a water tight box (been crap at it so far).
Was happy first attempt was completely water tight. Takes 11.4 litres of acid minus whatever the volume of lead sheets is. Its a tight fit but that's the material I had on hand. (The volume of the FF28 is 840ml if anyone is interested so the FF28 should weigh in at around 2.3Kg..haven't checked but feels about right). I added a drain valve to make decanting any contaminated acid easier (andsafer) and then a base for filming from below, feed back to acid bottle, and emergency capture tank if leaks start. It (the fin) requires active rotation (not gravity hang) to fit inside.
My lead sheets don't quite go to bottom of tank and annoyingly I have another roll lying around somewhere but despite lots of searching can't find it so will have to risk trying as is.
Next issue was the steam tank. (You are supposed to boil the anodised layer but this reduces any dye you have so steaming is preferred option. No way could this fin fit in the old steam bath so hunted around for a bigger cheap option. Despite being twice the size pot, still needed to extend it with Al flashing as this beast of fin still would not fit. This particular photo doesn't really show how much bigger new pot is.
Hopefully in the next few days get an opportunity to try it out.
PS..if anyone cares the FF18 dyed with turmeric and blasted to death with pressure blaster is still manky orange colour and not the yellow I'd hoped for...maybe over time it will get there.


The things we do when there is no wind.
You are having almost as much fun as Myth Busters.
Love your problem solving and tech skills
Some good stuff there Flex. I think I will poach the steamer idea.
I have trashed an old unused black laser printer cartridge for my dye. Next time I crack one open I hope to get most of it in my dye bath instead of everywhere else. ![]()
Don't worry about your lead sheet length. Apparently best practice is to have sheet 2/3 the size of the piece of you are anodising - apparently this stops the tips/edges from "seeing" too much current. ![]()
So , let me get this right , anodising is not the colour, it's a coating that goes over any colour you use . Could be food colour, ink cartridge or road kill ?
Select to expand quoteImax1 said..
So , let me get this right , anodising is not the colour, it's a coating that goes over any colour you use . Could be food colour, ink cartridge or road kill ?
Yep the anodised layer is made up of microscopically hexagonal 'cells' that are grey in colour. After the anodising process is complete, in the middle of each hexagon there is a pore. The size of the pore varies with the process used to anodise. The dye particles simply infiltrate the pores and are sealed in by the steaming part of the process. The cells are seriously small and as such there are a kazillion pores filled with dye in a small area. At a macroscopic level the surface appears to be coloured, but if you could zoom into the surface it would still be mostly grey with intense dots of dye colour.
The more intense the dye the better, so roadkill might be a bit bland. Best chuck it straight into the steamer and cook it up.![]()
Fangman missed one detail regarding dying. After anodising the layer is soft and the hex pores are open. To finish the process you have to boil or steam to harden the layer. This process starts at 50 degC and above. After anodising but before hardening you can add the dye to the pores that remains after you harden the layer. Colour might (or might not) make it look good but more practically shows if the anodised layer is still there or worn off. You absolutely cannot remove the colour without removing the anodised layer by caustic bath or resending etc. This layer is at best around 10 microns (0.01mm) so its very thin. Super expensive anodising might increase this to 0.025mm or so.
Today update, filled the new tank with H2SO4 (Sulphuric acid) and still no leaks. Decided to polish the FF28 but there were water/finger marks that metho and polish would not budge so redid a sand at 1200 to remove those. Then polished, hot soapy bath (gloves only from here), then in the caustic soda bath for a good 10 mins this time. Another hot soapy scrub then into the new tank. Crikey, was pulling 65amps at start but levelled off to around 55amps. I was getting 2 volt drop across my wires so the electrodes were only seeing 10Volts or so. Thats still 550W and that heated up the smaller volume of acid much faster. Tank was still turning black. I took tank to 40degC, depleting one battery and stopped as didn't get close to hardening the layer and also didn't want to risk the acrylic/polycarb tank starting to distort/glue separating so stopped the process. (batteries are LiFePo4..can't remember AmpHr rating but they can deliver 45+amps at above 10volts for about 20 min which would suggest honest useable 150+AHr)
Got a call at this point which needed relatively urgent attention so went and dealt with that hoping the tank would cool off. Left fin in acid. Recharged the camp battery#1 during this time. 2 1/2 hrs later tank had only dropped 5DegC. Started anodising again but this time with car jump start cables from battery. These also got too hot to touch. Whipped up a cooler using some 10mm Al tube lying around and a 12V camp shower pump that luckily fitted the tube perfectly. Ran ice bath water through for 40 mins or so and that dropped the temp down to 28degC. Then dumped all the remaining juice in both camp batteries until the temp had reached 40degC again and called it as the sun was setting.
Into water and scrubbed all the black goo off fin and chucked it in the dye tank. 2hrs later the porosity has sucked up some dye but its nothing special in main body so will leave over night. Lack of dye uptake means anodised layer is too thin or dye is no good/weak (or leaving in acid with no current stuffed the process).
Pictures of new setup with cooler and cooling fan and after finishing anodising. You can see surface surface porosity is highlighted. (only had video footage of polished fin but this hid much of the porosity.). You can see the black goo which I haven't rubbed off in 2nd photo left of brass nut hole.


If there was an advantage to anodising Stainless steel leading edges. I think I've given up the idea now.
Flex, I just read about stripping anodising off aluminium. You dip in sulphuric acid at 50-60 degrees. Your dye uptake might be poor due to the thinned anodic coating after the acid attack maybe?![]()
ya, think you may be right. That or the Al reacts with Sulphuric acid to create Aluminium sulphate which fills the pores/creates insulating layer. I'm sure I was getting 55amps for the first session on small cables and only 45amps after waiting 3hrs with jumper cables. After all night in the dye tank not much happening. Caustic soda also strips the anodised layer. So will strip, resand and start again. Will increase cooling tube length/cool acid more before start too. If need to stop (to recharge batteries or temp reasons), will remove fin from tank and rinse whilst wait.
Edit, removed from dye tank...not the slightest amount of dye penetration...but a HUGE amount of black goo still oozing out. Gave it a scrub....take a look at the bath water!

Question for all , does the anodising harden the surface or is it just to slow the corrosion. I'm thinking of a clear coat of 2 pack for mine
I was thinking of a clear spray in a can especially for mag wheels ?
I'm slack and never rinse my fangys and scrub off the white dots with a kitchen scrub before use .
Select to expand quotekato said..
Question for all , does the anodising harden the surface or is it just to slow the corrosion. I'm thinking of a clear coat of 2 pack for mine
as far as I understand, the anodising adds a very hard Aluminium oxide layer over the metal. As the Anodised layer is honeycomb shaped as Fangy pointed out it is much harder than the natural oxidised layer. So it adds a hard layer and stops/slow corrosion. You can see from my first attempt the colour is still visible after 1000's of km of weed travel...this suggests the wear to the fin is less than 0.01mm. That was the motivation for Fangman and I to revisit this process after his inspection of my fin.
Its ironic that you consume a pile of Aluminium oxide (sandpaper) prepping the surface only to try and put it back on. I would think clear coat won't be anywhere near as hard...but certainly infinitely easier to apply. Will be easy to see how long it holds up as should be shiny to start but start oxidising once the clear coat comes off. Certainly worth a try.
Select to expand quotekato said..
Question for all , does the anodising harden the surface or is it just to slow the corrosion. I'm thinking of a clear coat of 2 pack for mine
Yes the anodised layer is much harder than the original aluminium surface by a factor of 3 to 4 times. My previous attempts at coatings have failed because of the abrasive nature of the weed here. The coating wears off on the leading edge and then leaves an edge that slowly chips/peels off with time.
Select to expand quoteImax1 said..
I was thinking of a clear spray in a can especially for mag wheels ?
I'm slack and never rinse my fangys and scrub off the white dots with a kitchen scrub before use .
A 'Scotchbrite' type kitchen scrub worked well for me too if there was a lack of weed/wind to keep things clean.
Select to expand quoteFlex2 said..
...but a HUGE amount of black goo still oozing out. Gave it a scrub....take a look at the bath water!
The black smut seems to be never ending. I am really curious as to what it is, as it occurs in both the acid and basic baths and with/without current applied. I can certainly see why the commercial guys didn't want to touch cast aluminium for fear of contaminating their baths.
Kato, if you're only using the fin at lake George a clear coat is probably viable. The weed there doesn't seem to be abrasive, sailing at LG, I found my fins just got polished. But places like Lilacs will strip any coating off the leading edge in one session. Then as said, that will just chip and peel back through the areas in compressive flow.
Didn't get as far as long as planned as bank blocked my card due to fraudulent activity which I discovered trying to buy a few $'s of Al tube for the acid chiller. That ruined most of the day but managed to finish the chiller and stuff as much Al tube in tank to allow chiller to run whilst anodising without shorting stuff out.
Meanwhile, I'd left the FF28 soaking in a tub of tap water, after 10 mins the black goo was all over the surface again, rescrubbed then dumped it back in. (This is after the 12+ hrs in the dye tank where an incredible amount oozed out) End of day and still more goo oozing out (but less now). Started rubbing the fin with my finger when it suddenly dawned on me what this stuff is...I'd been staring at it for days..it gets into your fingers and takes forever to wash out. Wifey been complaining about me putting it everywhere. It is of course the sanding dust. Due to the porosity of the fins the finer you take the finish the deeper this stuff gets in.
I took a video and photos with my digital microscope but you don't need to see that as if you have a little water on and rub it a little like when sanding the particles behave exactly as if you are sanding. Its sort of like reverse sanding. The second attached photo shows a finger rub after 24hrs soak in tap water (after all that has gone before).
The clues so far:
1. My first fin (FF22), I'd rushed through, maybe finished to 800 grit possibly 1200 then polished. However I dry sanded at all times. The acid whilst anodising was relatively clear, check my video posted here from about a year ago to verify if you need to check.
2. The FF18, I finished one side to 7000 grit and the other to 1200..this time wet sanding. Whilst I avoided the desmut step the acid was black when anodising. After anodising still goo all over surface (which I scrubbed off)...it seemed to not effect the dying which implies it may be a neutral component
3. FF28, have been really fussy with the sanding and really over cooking the 1200 grit....all wet sanded. Might have put approaching 3hrs into this at 1200 grit... I overdid the caustic soda/desmut clean step but made no difference. Black goo everywhere.
4. Black goo coming out in relatively neutral water still after 24hrs..confirmed by Fangman that it just keeps coming.
Whether this has anything to do/effects the anodising process I have no idea. Certainly removing this crap before anodising will stop acid contamination at the very least. I think it may possibly effect the dying process (as in the goo is displacing the dye) so next attempt will be sand then soak/rub/scrub/repeat a number of times until the black goo stops oozing before the final desmut and anodise, then scrub/soak repeat and only drop in dye once the goo stops oozing.


Doh! Tricky is laughing at us for sanding too much already, this is way too much ammo to let him have!![]()
![]()
So if this is the source of the mystery never ending smut, the next step is a successful treatment... Perhaps I should try Waricle's welder's massive current delivery as a electropolisher to see if I can blast it out. Alternatively, maybe an ultrasonic bath?
I will also anodise one of my unprepared fins to see what level of smut amount I get.
On a positive note I found that the need to finish the fin prior to anodising is at Tricky level only. A decent anodised layer fills up all the scratches. The finish is uniform but a bit rough for me, but it can be sanded to whatever level required - still playing around with this - but it is flippin' hard so it takes a bit more elbow grease than the plain aluminium.
This is a very long shot, but how about trying voltage? if dust and fin are at the same electrostatic potential they should repel each other
I think the best approach might be a two step anodising. I just sped read this paper
www.researchgate.net/publication/299748481
In summary (I think): First, do a rough anodise, then remove entire lot back to base metal by mechanical means. The base metal now has the hex structure imbedded into its structure that will accept the final layer more uniformly. By complete accident this may explain why my first attempt on the FF22 was so good as I anodised, resanded then anodised again. All the weird dye effects seen on that first fin are probably all goo related and probably would have been avoided by much more cleaning after sanding/anodising. (If you look at the pics previously posted the best result is actually the Tuttle/powerbox connection where I didn't do any sanding, only grinding disk, maybe a 40 grit flapper..page 13, bottom of page if you are look'n)
(Probably can sand wet/dry to whatever grit you want at first, remove the goo by soaking, scrubbing, time etc to stop acid contamination, then proceed to first anodise, then sand it off and repeat)
You can make the final anodised layer much harder by increasing the anodise voltage to a lethal 100+ volts...this in turn reduces current but I've been playing with high voltage DC for the last few years and this is past amateur level and a real easy way to kill yourself so probably best not encouraged on public forum. Will stick with the 12V stuff for now...but I do have a 400V DC high current (1000amp) DC supply ready to go (ya, you read that right 400KW, 800 times more powerful than current system) to try out experiments but me thinks it will burn the fin or boil the acid in seconds or both....could be entertaining though...
Select to expand quotedecrepit said..
This is a very long shot, but how about trying voltage? if dust and fin are at the same electrostatic potential they should repel each other
I think ultrasonic cleaning could be another option...
I forgot to mention the other day, still on the subject of contamination, I placed an MDF board over my caustic bath to stop leaves falling in whilst I was polishing the fin (as I could not find the plastic lid for the tub). ..seems the caustic bath vapours dissolved the glue in the MDF and I ended up with a caustic bath with both floating and sinking MDF goo, I used this bath to clean my drains, not risk it trying to clean a Fangy fin....end story, stick to plastic for all this stuff
In the interest of seeing how long it takes to remove all the black goo I left the fin in tap water overnight (now 36 hrs submerged). Seems to have got the pox. The black goo keeps on coming when surface rubbed, to a much lesser extent though. Need to try different/faster cleaning methods as looks like might be damaging fin keeping in water this long. Not sure if this is more surface pitting coming along or something else but have pulled it out and will do some sanding. This will of course introduce more goo.
To really open a can of worms, been investigating Al cold spraying to repair the pitting and close these pores before anodising. Have some Al powder. Just need to get the particles up to supersonic speed and direct at fin.