Hi there! My name is Manos and i am from Greece! For the time being I live in Japan. I bought a used windsurf equipment in order to practice for the time I will be here in Japan. The board was not in such a good condition and lately there was a crack on the deck from where water came inside. I made a small hole in order the water dry easier. In the area where I live it is really difficult to find someone to repair her. Furthermore, I would like to repair her by myself. Could anyone help me doing it in the right way.


In the green search box ( above your post to the right ) type in " repair " and press return. This will find many posts . Really cool tips and informed discussion about awesome people showing the rest of us how to fix things that we have or may not have broken.
Thanks. I have already bought some materials, like epoxy, hardness, powder fiber glass. For now I am waiting the board to be well dried. I see some videos in you-tube and I am a little confused.
boardlady.com/ is helpful. Probably worth reading through the better part so you are at least familiar with what you might be doing.
And the search button, as suggested. Beyond that, you may want to be more specific. Your board has lived a hard life and covering everything without knowing exactly what you want is asking someone to write a long post about board repairs in general. I think this is one reason people are reluctant to answer. For example, what is it that is confusing you? Or which repair are you trying to tackle first?
Ok! You are right and thank you!
So, first I want to repair the deck where there is obvious a crack. About that you can see that there are also some small areas that have been covered with epoxy and seem ok but not so beautiful! Thus, I wonder it would be wise to sand all the area and covered it with a fiberglass, or I would make a bigger damage?
As for the nose there was an older repairing which was very ugly. After removing the most part of epoxy by sanding it I am thinking also to cover it with fiber glass to reinforce a little the area. what material I should use? 2oz, 4oz? This is about the thickness?
Also, about epoxy resin. It is needed to fill a hole, is that correct? You use epoxy resin with hardness (ratio 5;1?) and something else like powder( Qsells?).
A a fairly stand surface construction is 2 layers of 4oz fiber glass. Epoxy resins come in many varieties, some are 5:1, some are 3:1 and others are 2:1. They are normally bought together, and have the mixing ratio on the container. And it's usually part A, and part B, not resin and hardener, that's the terminology for polyester resin.
MAKE SURE you haven't been sold polyester resin, it will dissolve the internal foam, and leave a big hole in your board!!!!!!!!!!!!!!!!!!!!!!!!!!!!!!!!!
As long as you don't sand too deep, sanding and fiber glassing is the strongest option.
And yes mixing Qcells or micro balloons with epoxy makes a strong easily sanded filler. If youn want more strength you can use micro fibres instead.
Thanks for the advice!! I have already get a polyester resin but fortunately because i was not sure from the beginning about the specific material i make an experiment in a foam plate and after applying it there was a big hole on it. Here in Japan the communication is really hard!! Anyhow, I will try to find the epoxy resin. I would like to ask something else! What is the color of it. Is it clear or white or grey?
I want to do a good job!!! That's why I make so many questions!
Again it varies. I have some that is a very dark brown, some a light brown, and some that is clear.
Most epoxy will slowly turn brown with exposure to the sun, unless you get a UV resistant variety.
Most repairs are painted after the epoxy has cured.
I searched in many shops around the area for epoxy resin! I only found a small kit of 120g . (What do you recommend if i finally cannot find here and I need to make an online purchase since there are so many brand names). I think the quantity that I will need it will be bigger. What do you think? I will start with the crack-hole area on the deck! Sanding it until all the paint move away, and after i will put the epoxy filler( when I find it, is it ok to put talk powder instead of Q cells?). After that, I will install 2 layers of 4oz (it is written somewhere 4oz, 2oz ,6oz? how you can finger out) fiberglass to cover the area. Do you think it would be better to cover all damaged spots with one cloth or to cut small pieces to cover them one by one? Or it will be better to do not touch them at all and leave them as it is (They are covered only with epoxy)?
I want also to cover the nose with epoxy filler because I see some small holes from the previous repair and I am worrying for the sealing in that area.
I want to do the same with the rail side. As you can see the paint is totally removed and I also want to reinforce the specific area.
Thanks again for the help! Really appreciate!
Select to expand quotedecrepit said..
A a fairly stand surface construction is 2 layers of 4oz fiber glass. Epoxy resins come in many varieties, some are 5:1, some are 3:1 and others are 2:1. They are normally bought together, and have the mixing ratio on the container. And it's usually part A, and part B, not resin and hardener, that's the terminology for polyester resin.
Maybe that's different in Australia? Here in the US, it's usually resin and hardener for epoxy. See, for example, www.westmarine.com/buy/west-system---205-a-fast-hardener--318360 and www.jamestowndistributors.com/userportal/product.do?part=365246
Select to expand quoteboardsurfr said..decrepit said..
A a fairly stand surface construction is 2 layers of 4oz fiber glass. Epoxy resins come in many varieties, some are 5:1, some are 3:1 and others are 2:1. They are normally bought together, and have the mixing ratio on the container. And it's usually part A, and part B, not resin and hardener, that's the terminology for polyester resin.
Maybe that's different in Australia? Here in the US, it's usually resin and hardener for epoxy. See, for example, www.westmarine.com/buy/west-system---205-a-fast-hardener--318360 and www.jamestowndistributors.com/userportal/product.do?part=365246
Agreed. In West System, which we also get over here, they call it Resin and Hardener. I bought another local brand and I think it was labelled both, Resin and Hardner, and part A and part B.
I think it is the same all over the world. Also, here in Japan they have the same product but is hard to communicate if you do not know the japanesse language.
There are so many materials that make me confused 205, 206, 207 epoxy resin with their hardeness, and also many fillers. What to pick up?
here's what the data sheet says.
205 Fast Hardener is used, in the majority of situations, at lower temperatures to produce a rapid cure that develops its physical properties quickly at room temperature.Cured resin and hardener yields a rigid, high-strength, moisture-resistant solid with excellent bonding and coating properties. Not intended for clear coating.
206 Slow Hardener is used when extended working and cure time is needed, or to provide adequate working time at higher temperatures. Cured resin and hardener yields a rigid, high-strength, moisture-resistant solid with excellent bonding and coating properties. Not intended for clear coating.
207 Special Coating Hardener has been specially developed for coating applications where an exceptionally clear, moisture resistant, natural wood finish is desired.105/207 mixtures resist clouding in humid conditions and exhibit extremely low blush formation - as low as any epoxy, including so-called "no-blush" epoxies.105/207 has strong physical properties, so it can be used as a structural adhesive for gluing and laminating. It has excellent compatibility with paints and provides a beautiful, long lasting finish when used with quality UV-filtering varnish.
So I'd probably go with 205, unless your doing a big job, or the temps are high.
here's the filler blurb
410 Microlight410 Microlight is the ideal low-density filler for creating a light, easily-worked fairing compound especially suited for cosmetic or surface applications like shaping, filling or fairing. 410 Microlight mixes to a very smooth creamy texture that can be trowelled to a feather edge, and is less porous than other filling compoundshttp://www.westsystem.com.au/files/products.fillers/small_32w32/410_microlight.pdf Download 410 Data Sheet (112 KB) 411 Microsphere Blend411 Microsphere Blend is a low density filler which cures to a lightweight filling putty with excellent filleting characteristics. 411 Microsphere Blend is also used as a low density adhesive for edge gluing in strip plank construction.www.westsystem.com.au/files/products.fillers/small_32w32/411.pdf Download 411 Data Sheet (19.5 KB)
417 Low Density Filler417 is a low density microballoon-based filler used as a thickening agent with epoxy fairing systems to make fairing putties that are easy to sand or carve. 417 has a reasonably strong strength to weight ratio, and is recommended as the preferred filler under dark coloured surfaces. www.westsystem.com.au/files/products.fillers/small_32w32/417_low_density_filler.pdf Download 417 Data Sheet (502 KB)
I think you can take your pick,
So many thanks for your replies!!
Finally and after many hours of searching I bought some epoxy resin which i think is suitable for my board with some Q-cell filler. I could not find the one you suggest me!

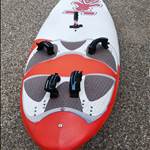
On the above photo do you think it is better to make a small opening to the crack in order to fill it with the epoxy filler and make a straight dig connecting with the main dig?
Some cracks have already only epoxy. What would you advise me? Leave it as it is or remove the epoxy put filler epoxy and fiberglass later on?


Here the rail does not seem to have any damage! I think only paint missing. In my opinion it will be good to reinforce a little the area by adding a 2 layer 4oz fiberglass after sanding it first. What do you propose?


About the noise now, It has been repaired again. It was definitely an unfinished job since I removed a lot of epoxy or what ever they had put as well as the barrier tape line. However, I was curious to see what was the damage that is why i start sanding it. After all, it seems that there is no a big harm. I am thinking also here to do the same as before sanding and fiber glass to reinforce the noise. Ok, maybe some epoxy filler where it looks like it is needed.
In addition, It is needed to put fiberglass on the top side of the nose on the marked spots or just some epoxy and finish?


Last but not least, as far it seems that I am going to have many repaired spots that they need to be painted. What if I decide to paint all the board with a spray? First, I need to sand all the area (sand paper size?)? Can I apply an thin epoxy film and after sanding again to spray the board or it is not worth it?
I am just thinking that maybe there are very tinny holes and with a thin epoxy film we could minimize the possibility to get sea water inside. Could the paint seal the minute pores?

I think you will have a lot of trouble doing so many tiny dents that are not letting water in. All of them will need a sand, skim of fill, lots of priming and fill and sanding to get it flat for painting. Go for it if you want to but there will be about 10hrs just in prep to get the little ones ready for paint - that won't match anyway- and then people wonder if the non matched paint area was in fact one huge repair and you've now devalued the board greatly.
So personally, I would fix the big holes that have to be fixed, and of all the stuff in your latter pics ignore them. Maybe just fill n prime then paint the rails all the way around. Leave the deck scratches and dings that are not letting water in alone. IMHO
So back to the original q'n and the bigger repair - it will take a while to dry out with that little hole so it needs to go in the sun for a couple of weeks at least , with the hole down, a few pieces of string rammed into the styro core to help it wick out.
Then fill all the holes with resin and q-cell, sand flat. (DON"T fill deeper than about 10mm and do it in the evening. Epoxy can get hot and melt stuff.)
Sand the wider area say 30cm x 15cm (guessing based on your pics) and give it one layer of 4oz (135gsm) glass over. Again, evening.
Fill with q-cell and resin mix, sand flat.
Then paint and after a few days - presuming you have a UV stable epoxy - very thin layer rolled over with foam roller and caster sugar regrip.
Easiest way for a beginner. Don't be thinking about replacing the top PVC foam layer (which I guess is what some youtube vids showed)
I'd not glass that rail either, just needs a high builder primer and sand to say 240grade wet and it will be flat enough, then a light prime and sand to 400 wet.
Oh and whatever you do, don't apply a thin layer of epoxy over the whole board, you will be sanding forever to get it flat before painting. You need a high build primer / spray putty and sand, then same again, to fill all tiny scratches etc. and it will still take a LONG time.
Many thanks for your advises Mark!
Ok, many things have been done (almost as you said). After pouring the epoxy- qcell mixture some holes have appeared. This has to do with the way that I made the mixing so the mixture kept some air inside?
Now, fiberglass is coming next! For make it clear I will make again a mixture of epoxy and Q-cells to put the fiberglass, not just the epoxy? After that I let it dry, sand it and finally I cover it with just the epoxy?
I was thinking on the small dings to put a small piece of fiberglass with only epoxy, just making them more robust.
Something else that I was thinking about; To apply fiberglass I should remove all the paint from the area that I want to cover or it does not matter if some area of the fiber glass lay on a paint area?
Regarding the painting, I want to have a different board since we have done so much work!!!
I have already removed all the stickers and I am wondering to replace them (making the board more cool) or not.
I am thinking to make a 3 colors design. Any suggestions?
Thus, I need to remove all the old paint and how deep or it is not necessary?
A local guy here he makes a mix with epoxy and tamiya color ( Tamiya Japanese scale models) when repair SURFboard not windsurfing board, i do not know if this is relative (he uses polyester resin) . The result is really good. So what if after sanding the overall board I was rolling over the board a very thin color UV epoxy. Then, Wet sanding and sugar re-grip. You think that epoxy will be to strong to be sanded compering to high built primer. You note that also if I put a primer spray I need to sand the board. The roller conditions look more convenient to me since I do not have a specific place to make the spraying apart from the beach!!! My apartment is quite small as well as my balcony (Definitely many neighbors will have been already wondering from where so much dust).
Some pictures of the project progress!!!


I saw that there were some small cracks continuing around the big hole so I made some holes to prevent any further cracks since I did not want to remove more vital material from the board!

Here, on the port side of the board the ding is some smooth when I pushing it with my finger. It was below sticker that is why I did not notice it previously. Settling Fiberglass with epoxy+Q-cells and sanding without making a small hole to pour the mixture inside before fiberglass it would be ok?


apply fiberglass with resin only. Adding q-cell weakens the resin somewhat. Save the q-cell for filling.
Epoxy should stick to paint if it's sanded, but if you are on top of the paint with the glass, you will have a lump. I taper sand back the area, then the paint is a guide to where flat is, when I sand the glass back.
If you have a soft area, it should be lifted and replaced, or resin syringed in underneath to stick it back down.
I was thinking also the same about the smooth area! Now I am sure! Thanks Decrepit
The paint part need to be clear now. Mark suggests high build primer spray first, continue with sanding , again the process and after that the paint! But what kind of paint I should use ? After done with the paint I should add some UV protection layer or should be included in the paint?
Select to expand quoteDratsas said..
I was thinking also the same about the smooth area! Now I am sure! Thanks Decrepit
The paint part need to be clear now. Mark suggests high build primer spray first, continue with sanding , again the process and after that the paint! But what kind of paint I should use ? After done with the paint I should add some UV protection layer or should be included in the paint?
For that, I'd use automotive acrylic spray cans. you can buy the spray putty to go with it at the same time.
Hi Decrepit!
Could you make it more clear to me? So finally how many kind of spray cans I must use?
1. High build primer spray can (Is this acrylic enamel or urethane?)
2. paint spray can with UV protection.
Which brand name you will recommend?
Don't know about brands, I just buy what the local automotive shop sells. I use an acrylic, spray putty, you don't need a primer on top of epoxy. Then an acrylic spray paint, this should already be UV protected. You only need UV protection on top of exposed epoxy.
Thanks Decrepit. I want to paint the whole board.
Spray epoxy and spray putty is different things?
Now that fibre glass job has finished, I am ready to proceed with the painting.
I should sand it, is that right? How deep I should go; until the fiberglass?
After that a high built primer(spray) need to be added on the total surface and sand it again. What number of sand paper should use?
One more time of high built primer over the board. After that, I need to sand the surface again or I can continue with the paint?
(Instead of the spray if I use the epoxy applying it with a roller it will be the same as when you put the spray? Epoxy is a primer too, isn't it? But takes more time for sandind comparing with the spray? Is this the only reason or I am missing something?).


Sand with about 80 grade on a block until you have taken the paint off around the repair - then you know your repair is same level as the original glass.
Then wet sand with 120 and 240 with a block, with a circular pattern.
Then a squirt with primer will quickly show if you have any low spots and scratches. (there will be deep scratches at the edge)
2 or 3 coats with spray putty, then sand bck with 240 and 400 wet.
Prime again and it should be nice and flat.
Light sand with 400 to make sure its smooth, then paint.
This is what I mean:
the white is resin and q-cell over the glass, then sanded.
Then grey is primer and the blue is spray putty.


If you want it to look good this is what you have to do and it takes a while......
BUT as I said you won't match the blue, so have to do the whole board, and that will add weight so be careful choosing......
Select to expand quoteDratsas said..
Thanks Decrepit. I want to paint the whole board. Spray epoxy and spray putty is different things?
If I was painting the whole board, I'd probably use 2 pack urethane.
Did I say something about spray epoxy???? Because I've never heard of it!
All I said is you don't need spray primer if it's on top of epoxy resin. Maybe Mark's using it because you need it on top of some paints. I've never bothered. I only use primer if I'm painting metal.