Thanks seabreeze community for help in designing board.
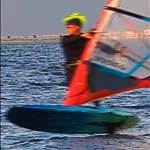
Just about finished up on 6'6" x 33" (maybe wider) 130lt wingboard. Wetsanded to 1500, will ad graphics to finish off in next couple of days. Double length track on bottom, tracks for footstraps on top. Took the general outline of a formula board and scaled down. Rails are hard, 90 degree slab sides with convex nose to flat planing area with no bevs.
I laminated top and bottom all in one go. Did carbon innegra core cork deck with carbon glass bottom. I laminated both sides using a contact spray to help with adhesion. Took about an hour to sort and get into bag. Will def use this technique in future.
Should get it on the water this week. Will be using with 2600cm2 wing hoping it will be a minimal pumping cruiser.
Cheers Chris


HI,
Yeah i went the double length track box, things are developing with gear so figured i would cover my bases by adding as much adjustment as i could. Board is basically a big barge for my 100kgs.
I didn't know where to put the handle as i laminated the centre block in a top to bottom wrap. I wish i had put a handle on the top now it would have made it a bit easier to handle. Weight is 6.9kgs pre deck pad, i used lightweight eps but added weight with tracks and beefing things up cause i am a bit hard on equip. Sorry phots are a bit out of order.


6.9kg is very light for that size and with long rails too.
And the foilbox build looks bomber.
What adhesive did you use to glue the EPS sections together?
And the lamination process, i like the idea of using contact glue to keep things in place before bagging...can you give some detail?.
You stick the lam layers to the EPS then wet with epoxy and then bag it?.
I used purbond on the joints, but also tried a couple of joints with epoxy to see how that worked. Epoxy was good but formed hard spots which needed a really sharp planer blade blade to deal with.
I started with the top cause it had the most laminations. Contact sprayed innegra into place, wetted out. Put on corecork cut to shape, then carbon and 2oz glass sanding layer on top. Put on peel ply and flipped board over.
I figured if flipping went bad then I could flip back over, tidy up and bag it. As it turned out flipping was easy, next time I would finish the sandwich area further away from rails to make process easier.
Laminate bottom, innegra, carbon, 2oz glass. Add peel ply, wrap in breather and bag. Total time around 1hr 20mins. Used 2 batches of resin with super slow hardener.
My bag was holding ok pressure but could have been better, I am sick of using bags made from that vinyl stuff sold locally. I have seen on videos plastic sheet that comes as a tube on a roll, you just tie a knot in one end and cable tie the hose in the other end, that looks the go to me.
Adhesive was tensor grip 49 from the fibreglass shop in Hobart was cheap, like around $20 for a can
hi
looks great.
why you used narrow strips of the foam instead of single block?
cheera
Really interesting build. I like how you reinforced in track boxes. A lot of extra work but it should pay off if you run a ground. Wish I was there to see how you managed that bagging. Just Great
With the finboxes do you just carbon over the whole thing and then cut out the slot after?
I guess the vacuum bag will suck the carbon into the slot a little but not enough to be a big problem?
I had visions of trying to seal it with bluetac or plasticine, but just going straight over the top would be easier...
Hi
I thought I would try narrow strips and cut the rocker and deck profile into each to see if had any benefits. I have been building foils that way and thought I would try scaling up the process. In hindsight, probably not worth the hassle, big hot wire is probably easier. I'm not a fan of the fumes when cutting big rocker sections with the hotwire plus I have never got a decent power supply going that doesn't cut in and out.
Yeah just laminate straight over tracks, I cut some relief slots with a razor down the centre of the track, I think this helps the laminations to seal down nice and tight. It doesn't matter tho you can see the track boxes easily once laminated, just drill through the skin and use a small flush cut router bit.
I wish I had been patient and routered these after the filling stage cause I slopped a bit of filler in the tracks that I had to clean out later. I was on a mission to get the board done in two weeks ready for my Christmas holiday.