hi all thought id pop on here and ask a question as i have been reading up a little on here and it seamed like there is a bit of diy shaping going on so though someone ma be able to help.
i have a back ground in composite molding and working with glass carbon ect but have never built my own board surf or windsurf however always been very keen to give it a go. ive only actually been windsurfing for a year now but totally hooked on it and more recently on slalom sailing.
i finally though i should give it a shoot at building my own board,im not to worried if it turns out rubbish to sail or not but hey havnt relay got much to loose and i can alway try again.
i though id have a go at building a little speed board i ges in the 65l mark. i have a couple of larger isonic's that i have been looking at reg. the bottom shape a little ect and the ruf dim ive picked off the internet but that is about all
firstly i guess is there any info on the net about speed board projects that may help me?
i read another thread on here about rocker lines but go a little lost as to what was all going on
im kinda a believer in the that looks about right method of building stuf but with what appears to be a lot of numbers going on i kinda want to get at least the basics planed out right
i picked up a very old board to use as the core for my first try.i have striped all the glass off it so left with a blank canvas with a mast track so first of im trying to figure where along its length should the mast track be.i was aiming for a length of 230cm overall and from looking at various pic and my isonic 105 was figuring the center of the mast track wants to be around 96cm from the front of the board.is that about right?
second question is about tail width,where is this measured is it from something like in between the rear straps or something along those lines?
a lastly can anyone give me a basic way of getting the rocker line ruffly right for a starting point in some simple terms.
sory for such a long first post i hope someone can through me a few pointers i love to be able to get something done and hopefully take it to weymouth speed week in october.
many thanks charlie
G'Day Charlie,
Tail and nose measurements are by old tradition 1 foot in, these days it's 300mm.
Basically a speed board needs to be very close to straight between the tail and about 1m in, then a slow curve to the nose. I'm not exactly sure at the moment, but I think, if you project a line along the rear flat, the tip of the nose should be about 5 inches up from it. depending how choppy the water is you'll be using it in.
And don't just think the smooth downwind run, don't forget you have to get back up wind.
The mast is usually measured from the back of the board not the front, it's a geometry between sailor, fin and rig. (centre of lateral resistance, and centre of lateral force need to be in line, otherwise you'll have trouble staying on course). I normally work it so that I can get the boom to drag across the back of the board. Then at least you have a water starting aid, but with some modern short wide boards this isn't possible.
For your first board it may be an idea to put in a long mast track, then you'll get a better idea where it should be for your next one.
Good luck
have a look at decrepits post on i think its west ozwind benders board ,lot's of info from wow to go, Gestalt allso did one awhile back with about 13? usefull videos ,
cheers dude being as its is a old board im using as a blank it is actualy quite long alredy with the gap to insert the uj in the middle,im kinda trying to work around the mast track just not shore if i shoud be shorterning the board from the tail or from the nose if you see what i mean.i dont know maybe it would be easier to repostition the mast track itself but it looks quite well built in to the glass stringer.
many thanks
When I converted an old wave board to a speed board, I cut the back, front and sides off, then straightened the rear rocker line. Changed the fin box but left the mast track where it was, I normally run the mast it all the way back in the track. The boom just about touches the back of the board in this position.


Some really basic figures to get you started.
For 65 litres I would make it 230 -235 long and around 45 wide.
Rocker should be pretty much flat to 75 from the tail but I would put 1mm of tail rocker in it. ,so 1mm of rocker between the tail and 30 off the tail.
From 75 off the tail to the nose it should be a smooth progressive curve. At the nose I would say 12.5cm rocker for absolute mirror flat speed conditions but would really advise to go for around 13.5 to 14cm.
This is pretty basic info but should put you on the right track.
As for bottom shape if you are building it yourself concaves can be difficult so I would avoid them, not needed for a speed board anyway .The simplest way would be to put a constant angle V right trough. The angle should be around 0.6 deg off horizontal so a combined angle of 1.2 deg.
My board has more V than this , I would not do less than what I have said.
With this rocker the centre of mast box should be 130 to 135 from the tail depending on the outline and tail width. For a wider tail you can go a bit more rearward and put your staps a bit more rearward, super narrow tail and everything goes a touch further forward.
I hope this helps get you going. If you have a CAD program that reads "nurbs" surface I could send you a basic shape.
cheers thats great thanks for all the info will be geting on it today.i had a god read through the thread aswell which was very handy.
one question i have always wondered about is the use of the thin foam between the glass/carbon .what is the main reason for this?im thinking along the lines of its just to give some spacing but tie together the two skins in a samwitch construction? for prototypes can you get away with out this?
i have acess to a lot of free pre preg carbon ex mclaren mercedes which im thinking if i ever find a good shape i could make a mold and make some real nice carbon skins and then eather fill with pu foam or laminte on but that thinking ahead a litle lol
will pop up some pics a little later cheers
edit: i do have access to auto cad but i have no idea about those files i will ask though. cheers
cheers thats prity mutch what i was thinking.ive just trimed the horible old looking blank down a little removed the old thruster fin boxes and fille the holes with some pu foam so will get the planer on it this eve and smooth it out a little. and post a pic
Charlie, if the old board didn't have sandwich construction it's probably a high density polyurethane blank.
We used to use 2 layers of 6oz glass over the top of this with an extra layer on the deck between mast base and tail. Putting foam sandwich on top of this is overkill and makes the board unnecessarily heavy.
Foam sandwich boards are typically low density polystyrene foam inside. this stuff is very weak and soft.
Without sandwich construction, this type of board would have a very short life span.
I disagree with notwal here, the board will have no where near as much strength, the rigidity of this sort of board is in the sandwich. It's in effect a beam, an interior under compressive loads, (the pvc) with tensile elements on each side, (fibreglass/carbon/kevlar, etc). without this on the bottom, as soon as you landed a small jump, with a bit of weight on the mast and feet, the bottom would crease as the board bends under the load. It only needs to do this a few times and the glass layer will snap, making it very hard to sail to shore!!!
Without the sandwich between the mast base and tail, the mast would soon start dissapearing into the deck, same with the foot pads.
With the foam sandwich you have a board that is both lighter and stronger than the old, high density foam interior with a thin skin of fibreglass.
The only advantage of this old system is polyurethane foam is closed cell, it doesn't suck water and doesn't need a bung.
It's also not a bad way to start down the shape you own board trail, it's not so labour intensive or expensive. And a 65l speed board won't be too heavy.
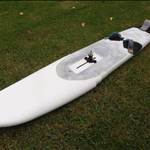
here where i got to today doesn't look great but slowly figuring it out,im thinking there not a great deal of volume in the tail of the board as it was quite skinny originally so thinking it may be worth sticking a bit more foam on the top or bottom to fatten it up a little.


If you base your board thicknesses and rail shape on that Isonic your can't go too wrong. As far as outline goes for a true speed board you want a pretty small tail as you are trying to get wetted area(drag) down.
yea the tail is a fare bit thiner i think i have some thin celotex isulation board which is the same foam so i will probly flaten the deck out and glue a layer of that on to bring it up. cheers
Choco , You must be telepathic!!! Matthew,Bonomator,Spotty and myself were talking about exactly that yesterday at Rye.
I would love to try it. I think as long as the board could be sailed back upwind on the other tack it could have advantages. The outline and bottom shape could be made more efficient and the rail shape could be optimised. For example you could have the leeward rail softer on the Speed run side so it won't grab and super sharp on the windward side for a clean release . The sharp rail on the windward side would also mean it is easier to get upwind on the other tack. Assymetrical tail cuts ect
We were also talking about multple fin setups.
I might find some time to design one, but a sad lack of fun tickets means that it will probably stay in my computer.
All donations welcomed.![]()
Hey Choco and Martin,
I think Dan Engdahl was experimenting with an assy speed board a few years ago, don't know how it went.
I was thinking of making another speed board with forward strap positions for the upwind leg so that I can pinch really high and just maintain a plane. I would make the board symmetrical but just switch the upwind straps depending on the tack of the strip. This would also make the rear single strap more comfy as I find on closely spaced rear straps you can't hook your toes as easily behind the strap.
I am not about to put additional inserts into a perfectly good board hence the making of one with spares I have sitting around.
Hey Charlieuk,
Here is a board I shaped(in 1996) from a larger board I had made a few years earlier. I left the bottom skin/sandwich and glassed(carboned![]() ) the deck with 2 layers of 6oz carbon plus reinforcements. Since I knew the density of the foam I could get away with making the deck in this way. It did ding a little but it only cost about $150 worth of carbon and epoxy, pretty cheap for a speed board and environmentally friendly (or at least hopefully neutral).
) the deck with 2 layers of 6oz carbon plus reinforcements. Since I knew the density of the foam I could get away with making the deck in this way. It did ding a little but it only cost about $150 worth of carbon and epoxy, pretty cheap for a speed board and environmentally friendly (or at least hopefully neutral).
The board that I used was a 290/130L and the position of the speed board was slightly forward of the tail of the old board. I used a jig to give a little more nose lift as we used to have only choppy conditions. This rocker jig was tacked (with putty) onto the hull while the deck was glassed so I suppose the board has a little preload.
An alternative to a sandwich deck is a shell of lightweight filler (~2mm) under the skin, this was the precursor to the modern sandwich board and the mothod used to make a lot of the early long raceboards.