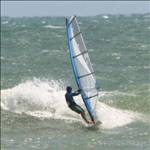
figured i'd continue this thread on from the wello thread in the qld section. ![]() i'm kind of keen to see what everyone else does as it may also help the other amateurs on the forum.
i'm kind of keen to see what everyone else does as it may also help the other amateurs on the forum.
personally i'm not using any sharpening etc on my camera. it's set to take jpegs on neutral setting in burst mode with aperture priority. i use aperture priority to control depth of field becasue i prefer that but do it with as higher shutter speed possible with iso's between 200-400
camera is set to :-
centre weight metering,
auto white balance,
single point focus,
iso between 200-400
shutter speed 1/1200 and faster
aperture between f4 and f8
i'm not using filters either. i found that using a polarizer killed my shutter speed/iso/aperture options. (probably where a f2.8 pro lens would be a good option) ![]()
was also given some other very good reasons to ditch filters from far better photographers than me. (cheers hairy ![]() )
)
couple of observations i've found are
using max zoom on my lens (canon 70-300mm is usm) results in slightly better focus when set at f8.
less than 200mm zoom and f5.6-f4 is crisper.
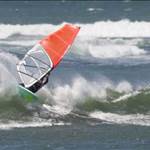
when the distant background has landscape in it, like a couple of kilometers away, or if the subject is stretching your lens zoom capability. use a higher, (ie. f8) aperture number
when doing handheld, shutter speeds faster than 1/1200 are required.
even when you rhink you are holding the camera still you are not. ![]() a monopod is a good investment.
a monopod is a good investment.
no matter what, focus is the most important thing. any effect or filter outcome can be created in photoshop.
always shoot with the sun as close to behind you as you can. photos look livelier and the sky has a deeper tone to it.
a good link from a pro bairdphotos.com/surf-photo-blurb-101/
as my camera is set to neutral i have to use photoshop. some stuff i've found on the net, tried and found to work.
1. using a large diameter unsharp mask with small threshold and low percentage removes haze from images.
2. reducing the blue channel in curves also reduces the blue saturation beach photos seem to get.
increasing the red channel of curves adds warmth to images.
3. a small diameter unsharp mask with low threshold and higher percentage adds crispness but over sharpening is bad ![]()
4. setting levels is a must.
5. as my camera is set to neutral i also add contrast and saturation to my images.
youtube has some good video tuts for us beginners.
good links.
pshero.com/photoshop-tutorials/photo-effects/the-velvia-effect
www.photoshoptutorials.ws/other-tutorials/photography-tutorials/polarizing-filter/http://www.popphoto.com/howto/
yowzerz...if thats beginer talk, wouldn't like to hear the pro stuff...
Q. How can i stop WHITE out, from the waves, with my bog standard digital camera???
Windy, you might have a "snow" or "surf" setting on your camera, use that. My optio has a whole heap of presets, one of them is "surf" another is "snow" both seem to work well at the beach.
Gestalt's at a whole different level to us ![]()
> always shoot with the sun as close to behind you as you can.
That's the most usable of your advice for general water sport photography, regardless of equipment.
It's an advice that's difficult to apply in windsurfing. When I wanna take freestyle moves, the angle of the board versus camera is what dictates the shot first and foremost, not the sun. You're right: colours and contrast suffer then.
Often I want the cam to be to windward so the sailor can be seen, or to make sure the move is fully visible. But that restricts my choices for sun and positioning (need to be on water if wind is on-shore, find a wharf, but then bottom gets shallower and more dangerous for the guy on board, etc.)
Lucky digital picture is free once the camera is purchased...
>always shoot with the sun as close to behind you as you can. photos look livelier and the sky has a deeper tone to it.<
virtually impossible in WA. the sun sets in the west so the sun is directly in your face when the best wind and best shots are ready to happen ![]()
![]()
![]()
get a water housing!
in wa shoot from the water in the arvo and shoot up close - 50cm - 5m distance from subject anytime during the day and you'll get great results.
no matter what - get close and shoot WIDE.

Select to expand quoteGestalt said...
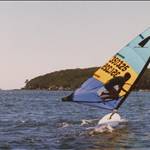
figured i'd continue this thread on from the wello thread in the qld section. ![]() i'm kind of keen to see what everyone else does as it may also help the other amateurs on the forum.
i'm kind of keen to see what everyone else does as it may also help the other amateurs on the forum.
personally i'm not using any sharpening etc on my camera.
BLA,BLA,BLA,BLA.
Well thats were the beginer photo tips lost me, SORRY.![]()
![]()
Whats the ISO do? and apature?
These days it seems that more time is spent photoshopping images as to taking the time to learn how to compose and shoot.
As panda said - if the image is not there then no amount of photoshop will help.
As this link was hinted to be beginners advice, why not try some basic advice.
A photograph is the product of reflected light from a subject being caught by a camera and recorded on light sensitive film. Now your digital camera electronically records this process or exposure. If your film was not exposed to enough light your image is underexposed (very dark), if too much light was recorded (overexposed) the image would be blown out / white almost. From a digital media point - this is still the case, if you under or over expose your image photoshop cannot repair it. Yes you can tweak the hell out of it but it will never be the same as exposong the image properly.
What affects exposure? Remember we are recording reflected light.
What is the ISO?
ISO sensitivity expresses the speed of photographic negative materials (formerly expressed as ASA). Since digital cameras do not use film but use image sensors instead, the ISO equivalent is usually given. eg 100, 200, 400, 800, 1600 etc
What ISO denotes is how sensitive the image sensor is to the amount of light present. The higher the ISO, the more sensitive the image sensor and therefore the less light required to record the image.
In film terms, faster film say asa 1600 or 3200, would have much more grain (roughness/clarity) than that of a slower film say asa 100 or even 400. Digitally, I believe that this is similar - if others know otherwise I would be interested in how it differs.
What is the Aperature?
The main function of a camera lens is to collect light. The aperture of a lens is the diameter of the lens opening and is usually controlled by an iris.The larger the diameter of the aperture, the more light reaches the film / image sensor. Aperture is expressed as F-stop, e.g. F2.8 or f/2.8. The smaller the F-stop number (or f/value), the larger the lens opening (aperture).
The aperature call also affect the depth of field of an image. A large aperature say f/1.4 will have a very shallow depth of field (blurry background or foregraound depending on your focal point). A large aperature say f/22 will have a very deep depth of field - everything will be in focus.
What is the Shutter Speed?
Effectively, it is how long the shutter remains open. Usually expressed in units of a second. eg 1/60th 1/100th, 1/1000th. Obvousley the longer the shutter remains open the more light that it lets in.
A consequence of shutter speed is blur. Slow shutters require objects to be very still otherwise your image will blur. Fast shutter speeds will capture moving objects as if they were frozen in space.
Taking a correctly exposed image requires and understanding of these parameters and how they interact.
This is basic information that may help. There are so many other adjustments that digial cameras have over their film bretheren. But that is for someone more experienced with digital than I to explain.
I have been working with black and white and trany (slide) film for donkeys (avid amateur) and have been a fan of ansell adams' zone system - which is in-depth stuff about getting the right exposure.
I have only recently ventured into the digital era, and am still getting grips on my new toys. I personally believe that with the advent of digital cameras, people may be less inclined to understand the basic process of how photographs are recorded, and spend more time in post image re-touching than getting the right image in the first place.
I am not a digital cynic, i have seen some fantastic digitally manipulated images. But on the otherhand i have viewed amazing film images - ie Ansell Adams and Peter Lik, Steve Parish etc.
BTW - I have no-idea how to use photoshop, wifey can so that helps![]()
Wormy - hope this has helped.
It Sounds like your a book of knowledge.
Get your self a Canon 1d Mk 111 or a Nikon D-3 and start shooting Raw.
Just did.
Upgraded from my beloved 3 to a new 1D mark 3. Would have preferred a full frame sensor - but not so keen on the 5D. Nearly tempted to buy a Nikon D3. But the cost of changing lenses would mean no sailing for the next 2 seasons.
A quick question to those in the know - do you shoot straight raw only or do you also save a jpeg as well. Are there any benefits of going this way. Also with a 10mp camera do you hang out with the large files, or can you get away with any form of compression?
cheers
The D-3 From Nikon is suppose to be Ducks nutts... I am not going back to Nikon Though since jumping ships after the D1-X....Oh Yeh and the Fuji S-1 Pile of Crud...

I agree about the size - tried to open an image the in-laws and their computer basically abused me.
So it might be prudent to shoot a raw plus Jpeg and manipulate the jpeg and if it works out do the same with the raw and chuck the rest out.
Having 90% of my interest with monochrome - what is the best way to truly convert digital to B&W? I am a photoshop gumby - and generally go for the generic convert filter thingy, and it basically sucks. Which is partly why I have remained with film for this long.
Agreed converting raw files is a pain, most new cameras can shoot in raw and also a j-peg at what ever size you want, with in reason of your cameras capabilities..So you have the Raw if it`s that kick ass once in a life time shot Like a nude..
i reckon if you're shooting in raw you better take a laptop or a portable hard drive with you. i can fill my 4gig card no probs and regularly take 600-800 shots in a session in jpeg mode. i have also taken more than 19 shots in a burst mode which means i would have lost frames if i was in raw.
although raw has the avantage of post production and more specifically exposure, (especially when shooting into the sun) for me jpegs are easier to deal with windsurfing photos and help me get as many frames as possible.
for all other photos though i am starting to use raw though.
with photoshop i don't see the issue. yes framing and exposure are important things but photoshop is a digital darkroom and should be viewed that way. through my work i have seen some of australias best photographers in action and i guarantee every single one of them uses photoshop.
even in the old days of the darkroom you still needed to tweak the developing and do multiple prints to get it right. that was friggin expensive. ![]() now it costs nothin but time.
now it costs nothin but time.
also if you are going to shoot in raw you will have no choice but to use photoshop or the software that comes with the camera.
polarizers - no argument that detail not recorded is detail lost. but most give advice to go get a polarizer, whack it on your camera and off you go. i listened to that and wasted loads of images. we shoot in poor light, mostly overcast and have prosumer lens. not a good recipe for the 99% of photos we take especially if there is a polarizer involved. the difference in shutter speed on my camera with fixed aperture and fixed iso with and without the polarizer is a whopping 400-600th of a second.
mines got the ever popular 40d dodgy shutter syndrome. got to press shutter extra hard to take shot![]() i think ive worn it out already
i think ive worn it out already