Hi Guys.... I've Googled it and read a bunch of old SB threads. I've also repair lots and lots of surfboards during my life, so I'd rate myself as pretty experienced. Why ask for help then? Well, I've pretty much always repaired polyester surfboards. Another reason is, my board is carbon fiber, so I'm wondering if I can still use fiberglass (and fiberglass rovings) for the job? Also, is there something similar to Q-cell that I can use?
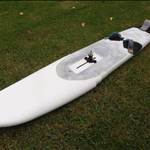
I hit jet some jetski wash on the weekend and executed an un-recoverable spinout ![]() Standard scenario...mast hits the nose and leave a nice crack. Not too massive, but big enough to warrant some decent TLC.
Standard scenario...mast hits the nose and leave a nice crack. Not too massive, but big enough to warrant some decent TLC.
I was going to pick all the bits of carbon fiber out and sand it back nice and smooth... then I was going to take the lazy route and use solar cure. However, I know this isn't the best approach, but it'll be water tight.
Any suggestions?
Cheers
Nigel
The other thing I was considering was to hit my local surf shop and buy an epoxy repair kit, which I've used before on surfboards and the come with resin, hardener, small amount of cloth (not carbon though) and q-cell. Now I think about it, this is probably my best bet... but damn I hate sanding boards :(
Since u are in NSW, there is a recent thread on this
www.seabreeze.com.au/forums/Windsurfing/New-South-Wales/Where-to-buy-board-repair-material-in-Sydney/
Select to expand quote2035 said..
.. but damn I hate sanding boards :(
if you hate sanding boards put some duct tape around the out side of the repair, do the repair and wait until it goes tacky then put some heavy blue masking tape over then run a fiberglass wheel over the lot, when it has jelled get a long Stanley blade and scrape too blend in
the problem with sanding is you sand the existing part , don't get me wrong you will need to sand but only minimal
Select to expand quote2035 said..
my board is carbon fiber, so I'm wondering if I can still use fiberglass (and fiberglass rovings) for the job? Also, is there something similar to Q-cell that I can use?
then I was going to take the lazy route and use solar cure. However, I know this isn't the best approach, but it'll be water tight.
Any suggestions?
Cheers
Nigel
you can get 210gr uni carbon $22mt from fgi brookvale + a fine glass cloth as well as resin , any of those uv resins are ok for small jobs , i have found on bigger repairs they promote air bubbles the best thing to do is keep it simple
ill give you a tip on repairs ![]() if you approach the repair the same way a dentist would approach a filling ( i know it's on a much smaller scale ) but a dentist cant afford any guess work , what he will do is thoroughly clean the repair then pack with a resin and then shape with a tool and at the finnish he will lightly buff the repair,
if you approach the repair the same way a dentist would approach a filling ( i know it's on a much smaller scale ) but a dentist cant afford any guess work , what he will do is thoroughly clean the repair then pack with a resin and then shape with a tool and at the finnish he will lightly buff the repair,
the reason why i have gone into so much detail is most of the cobra type boards only have a very fine layer of glass 3oz at the most , if your sanding the repair and sand into the original glass it won't take much to sand through to the divinicell
If it's just a crack around the nose, fibreglass will be fine.
Carbon is for stiffness, you don't need stiffness there, treat it exactly as you would a polyester board, just DON'T use polyester! And q-cells work fine with epoxy.
Select to expand quotedecrepit said..
If it's just a crack around the nose, fibreglass will be fine.
Carbon is for stiffness, you don't need stiffness there, treat it exactly as you would a polyester board, just DON'T use polyester! And q-cells work fine with epoxy.
Yep... it's minor damage. All good with a bit of epoxy resin and som sanding. Thanks guys
Forget sanding.
Grind the crack out shallow and gently bevelled, and glass it so glass is slightly below the level of the paint, then fill with a couple of mm of q-cell mix which is really easy to sand.
Once you get the levels right it is easy, never needed to hand sand more than about 5mins for a basic crack repair.
Thanks for the feedback guys. As mentioned I've repaired (and shaped) quite a few surfboard, so I took the same approach with my sailboard.
As usual, once I started picking away the cracked carbon fiber, the hole ended up being a fairly decent size.
My board's black and even with the "breather hole" unscrewed my problem were bubbles coming through my mix... lots of bubbles ![]() Maybe I'd done something wrong?? So once it cured, I dug out and started again.
Maybe I'd done something wrong?? So once it cured, I dug out and started again.
This time though, I bogged the (now even bigger) hole with MARINE epoxy putty. It's a two-part epoxy putty which is kneaded in your hands and hardens in a matter of minutes once mixed. Great stuff!!!! It allowed me to really push the putty (like play dough consistency) into all the cavities and no air bubbles were able to push through.
I then scraped off the excess and used Gladwrap to mold the putty to pretty much the exact shape of the nose and rail, which meant very little sanding. I still sanded it back once dry and finally applied a coat of Epoxy resign.
I didn't apply any matting, so I hope the hole (pun) thing stays together.
Finally, a coat of black spray paint was applied and it looks brand new. Apart from the shiny paint compared to the mat, you'd never tell there was a hole there.
So anyway, MARINE putty is really awesome!!! I'll definitely use it next time. I'll forever use it instead of q-cell and, if necessary, apply glass on top, but I don't think it needed it this time.
Peace
Nige
Select to expand quote2035 said..
Thanks for the feedback guys. As mentioned I've repaired (and shaped) quite a few surfboard, so I took the same approach with my sailboard.
As usual, once I started picking away the cracked carbon fiber, the hole ended up being a fairly decent size.
My board's black and even with the "breather hole" unscrewed my problem were bubbles coming through my mix... lots of bubbles ![]() Maybe I'd done something wrong?? So once it cured, I dug out and started again.
Maybe I'd done something wrong?? So once it cured, I dug out and started again.
This time though, I bogged the (now even bigger) hole with MARINE epoxy putty. It's a two-part epoxy putty which is kneaded in your hands and hardens in a matter of minutes once mixed. Great stuff!!!! It allowed me to really push the putty (like play dough consistency) into all the cavities and no air bubbles were able to push through.
I then scraped off the excess and used Gladwrap to mold the putty to pretty much the exact shape of the nose and rail, which meant very little sanding. I still sanded it back once dry and finally applied a coat of Epoxy resign.
I didn't apply any matting, so I hope the hole (pun) thing stays together.
Finally, a coat of black spray paint was applied and it looks brand new. Apart from the shiny paint compared to the mat, you'd never tell there was a hole there.
So anyway, MARINE putty is really awesome!!! I'll definitely use it next time. I'll forever use it instead of q-cell and, if necessary, apply glass on top, but I don't think it needed it this time.
Peace
Nige
Not to be an ass... but that two-part knead it stuff, will fall out the first time you give it decent knock. And it probably isn't water tight.
FWIW, your first attempt sounded like it actually would have done the job, ie if you had to dig it out and it made a bigger hole, then it must have stuck ok.
Yep, sand it back and put some cloth over it, other wise the first little tap and you're taking in water.
^^ agreed with last 2
asked the question then disregarded the advice.... ![]()
BTW, 2035 the bubbles were due to air escaping, so do it on a falling temp - ie: about dinner time.
You still had the same issue with the MarineTex it was just less obvious as it is thicker.
Right-o. I'll put a layer of glass over the top of it today. No biggie. I get the putty is heavy but we're talking about a 50 cent size hole. Anything bigger and I'd use q cell. Cheers, Nigel