Hey all, Though I would share a little project I've been working on for a month or two during the winter months down here in Melbourne. This is a bit of word vomit, so excuse the grammar and spelling.
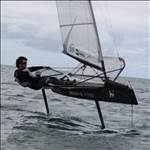
Having come from a background of sailing hydrofoil moths, ive always had the intention of putting foils on a windsurfer. I picked up a bunch of windsurfing gear a year or so ago off gumtree and taught my self the basics (very basics). Below is a basic break down of how i have turned a bunch of old bits into what hopefully will be some working hydrofoils for a windsurfer. I didn't have any real plan, just winged it as i went.
Over the winter I picked up a few old broken moth foil bits, some tube and a bit of carbon and got moving on fixing up the old moth bits to a usable condition. This took a few weeks.

Once i had them all fixed up I laid up a heap of carbon to form the base plate of the foil mast to attach it to the board. I used the base of my bic 283 as a mould to get the shape right, this proved to be a wast of time and a mistake as flat plate would have been better but whatever.

Once that was done I cut the foil mast to the correct hight and angle and stuck the base plate on. That week I scored a vacuum pump off a guy that worked at BOC gas for $50. Saved my self $500. I laid up a heap of carbon over the the glue join of base plate and foil mast, vacuumed it down and stuck it in my home made oven (rubbish bin, bbq thermometer and heat gun) to cure.

The next step was making the join of the foil mast and fuselage. I wanted to be able to disassemble the foil so I could change the geometry if it didn't work so I cut a tight slot the shape of foil mast in the fuselage. Once i was happy with that and it was around square and straight I blocked the insides of the tubes about 100m away from the slot on both sides. As the tube was tapered, i used two different wine bottle lids that fitted perfectly to block it off. Once the slot area was blocked, I filled it with some high tensile resin, micro fiber and finely chopped carbon toe. I let it settle and heated it to make it more viscous and then inserted the foil mast that was coated in mold release.
That went off, it came apart ( thank god) and then started to cut the main foil profile into the bottom of the fuselage. I then shaped some high density foam to the profile of the main foil and inside diameter of the fuselage tube and glued it in the tube. During this process I drilled the holes to count the main foil to the fuselage and set some nuts into the HD foam in the fuselage.
Once that was done the fuselage was right to be reinforced as it was only about 1.5mm wall thickness. I laid 5-10 layers of Uni carbon and 45/45 over it and vacuumed it down and baked it. I filled the foil mast slot with bluetack to prevent any resin messing up the super tight socket and also filled the nut holes.
At this point I really started to think about how the board will handle the foil and if i wanted to move the join of the foil and board forward of the fin box. The more i though about it, the more i wanted to have ability to move where the foil attaches to the board. The Bic 283 is an old board, made of fiber glass, soft foam and plastic. I had cut the nose off it already because it broke in a stack / it didn't fit in my car to well so i knew it would be hard to make it strong enough to deal with the foil. I couldn't get the epoxy to bond well to plastic no matter how well i preped the surface. I jumped on gumtree and found a 2005 ish Starboard HyperSonic 133L, 2 x Neil pride race sails, carbon boom and a x9 430 mast in great nic for $450.
With the problem of the board sorted, i then started to finish off the fuselage. Finding the slot and nut holes was a lot harder then i thought it would be. I ended up messing up one nut so bad i had to mill it out and re set it.
Next step was the bed the main foil to fuselage so it had a hard, perfectly shaped bed to rest against so it didn't point load or rock side to side. That was just a matter of coating mold release on the foil and mounting screws and squishing big blob of resin and microfiber in the join and running my finger around the edge to make a nice fillet.
I then ordered 2 x 10 inch mast tracks from a place in Perth for $30 each. The rear stabiliser was the next step. I had a moth rudder hydrofoil but it was way to big so i cut the tips of both sides, glued in a bit of carbon plate in the end of one tip, let it set then glued the other side onto the other half. Once that set i laid a layer of 45/45 over the top and bottom of the join. At this point its really starts to look like a foil!

Now its time to start work on the board. I had settled with inserting two mast tracks in the bottom of the board just forward of the fin box. The mast tracks arrived so I began setting them into some HD foam blocks to help spread the load. This was fiddly as I only had 9mm foam sheets so i had to laminated a few bits together and cut them and glue them around the mast tracks. I wouldn't do this again, it took forever, it is heavy and was just plain annoying. A big block of HD foam and router will be the plan of attack next time. It would save a good 200grams and take 10 mins not 5 hours.
With my tracks set in foam blocks, i begun chopping up the board and routing slots to fit the blocks. The HyperSonic is a very different board. It has two massive concaves on the bottom with a 80mm wide flat bit down the middle. I used the flat spot as level, measured the blocks out and then routed out the slots in the board. This wasn't easy as the depth of the slot changes due to the concave. Resting the router square on the edge of flat middle bit was a challenge. The router base plate only just big enough. Got it done though and it came out surprisingly well.


Once that was done, I laid up a few full layers running from left to right though both slots, an extra one over the little bit between the two slots, a few going front to back and then stuck the blocks in. I vacuumed that down but left a little hole in the vac film so it didn't stuck down all they way and crush the board.

While that was curing I bedded the rear foil like i did the main foil. This now takes us to last night. I drilled the 10mm holes in the base plate and ground down two sides of the bolt heads to fit in the mast track T slot and mounted the foil for the first time. I am happy with how stiff is all is. After a beer sitting there looking at my work, i pulled it apart, filleted around the foam blocks to fair them in a bit and give some easier curves to stick a few layers of carbon over the bottom of board, I should be able to do that this weekend and then im right to hit the water ;)

Could you try and adapt the moth foiling system (2 foils and the wand at the front to control the angle) on a windsurfing board or would that be to heavy/inefficient?
I've always wanted to see something like that.
I think you would have problems turning having two verticals spread apart. I would try a wand/flap on similar arrangement like what I've made. I was thinking about it last night, i dont think it would be to hard.
Your pics made my neck hurt, but I'm okay now.
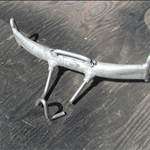
Those bolts and nuts protruding from the foil mounting plate (last pic), is that the only way you could do it? Those are going to give you some serious drag when trying to get the board up on a plane.
Why not use, universal nuts and screws that would fit into them? There are universal nuts out there that accept screws that are almost 1/4" in diameter (sorry I'm not a metric guy), and then you could get some stainless screws that are the perfect length, with smooth round heads.
Select to expand quoteOldM8 said..
I think you would have problems turning having two verticals spread apart. I would try a wand/flap on similar arrangement like what I've made. I was thinking about it last night, i dont think it would be to hard.
I'd be keen to see that on the water.
Select to expand quoteMastbender said..
Your pics made my neck hurt, but I'm okay now.
Those bolts and nuts protruding from the foil mounting plate (last pic), is that the only way you could do it? Those are going to give you some serious drag when trying to get the board up on a plane.
Why not use, universal nuts and screws that would fit into them? There are universal nuts out there that accept screws that are almost 1/4" in diameter (sorry I'm not a metric guy), and then you could get some stainless screws that are the perfect length, with smooth round heads.
Just started foiling bolting a Zeeko Alloy foil to my old Directional kiteboard and can say that the bolts and nuts on the plate will not hinder the planning.
the added lift from the foil more than compensates.
Select to expand quoteRAL INN said..Mastbender said..
Your pics made my neck hurt, but I'm okay now.
Those bolts and nuts protruding from the foil mounting plate (last pic), is that the only way you could do it? Those are going to give you some serious drag when trying to get the board up on a plane.
Why not use, universal nuts and screws that would fit into them? There are universal nuts out there that accept screws that are almost 1/4" in diameter (sorry I'm not a metric guy), and then you could get some stainless screws that are the perfect length, with smooth round heads.
Just started foiling bolting a Zeeko Alloy foil to my old Directional kiteboard and can say that the bolts and nuts on the plate will not hinder the planning.
the added lift from the foil more than compensates.
That's just great, however I've got many kite foiling buddies that all use the method of assembly I suggested.
Also those kite foils spring up out of the water almost instantaneously, whereas w'surfing foils take longer to get up and going, so every little bit helps.
It's just a suggestion that has proven to work.
Select to expand quoteMastbender said..RAL INN said..Mastbender said..
Your pics made my neck hurt, but I'm okay now.
Those bolts and nuts protruding from the foil mounting plate (last pic), is that the only way you could do it? Those are going to give you some serious drag when trying to get the board up on a plane.
Why not use, universal nuts and screws that would fit into them? There are universal nuts out there that accept screws that are almost 1/4" in diameter (sorry I'm not a metric guy), and then you could get some stainless screws that are the perfect length, with smooth round heads.
Just started foiling bolting a Zeeko Alloy foil to my old Directional kiteboard and can say that the bolts and nuts on the plate will not hinder the planning.
the added lift from the foil more than compensates.
That's just great, however I've got many kite foiling buddies that all use the method of assembly I suggested.
Also those kite foils spring up out of the water almost instantaneously, whereas w'surfing foils take longer to get up and going, so every little bit helps.
It's just a suggestion that has proven to work.
Hey Mastbender,
I am thinking about reducing the screw size and having the nut in the track and having smaller screw heads with fairings around it. But right now I want to just give it a go ;)