My attempt at converting a windsurfer mast and sail for use on a mini landyacht
inspired by landyachts posts on this forum
The mast is a 4.6 metre part carbon one that I procured second hand for $30
some time ago This was cut into three pieces and joined using Australian bluegum
as joiners The mast was also reinforced at the joins by a wrapping of glass tape
and epoxy resin A stiffener of Western red cedar was inserted in the base

The sail That I recut is shown here on top of a class5 sail for comparison

This photo shows the sail after the luff and foot has been cut off

The sail after resewing the luff and foot adding the reinforcing to the clew etc
The sewing machine used was a domestic Janome which handled the job very well
operated by my longsuffering wife [she wouldnt let me near her machine] We broke three needles but this was only when we hit the seared webbing ends The machine would have been better at this job if it were geared down slower but was quite adequate overall I obtained some 5mm plastic and made some batten cups on the drill press instead of the original webbing ones
The wrinkles at the batten ends I hope will come out when proper battens are fitted I ripped down some timber and fitted temporary unshaped ones to the pockets for the photo and to see how the luff looked
The final size came out at 4.4 sq M and 3.8sq M with the reef in
Shown here fitted to the class5 I hope to try it out on
The total cost of mast and sail after alterations to both is $92 without battens
Many thanks to landyacht for his great advice and inspiration

Noice!!!!!!
given the way the batten cups are just hooking past the mast when sheeted, Id say youve got it just nice, well done![]()
be sure to give us the sailing test result!
when you load it on your mini I would suggest plenty of downhaul
You're doing some good stuff there Hiko. I think I see a sewing machine in my future somewhere.![]()
Thanks Guys The Janome is an old zigzag domestic It only has a small throat but all the sewing was on the edges so that wasnt too much of a handicap
It was done on the dining room table also
I used double sided tape to hold things in place The machine had to handle that
multi layers of sailcloth and webbing and it did great and looks OK at a distance!
Bravo Hiko!
I too am interested in how your newly cut sail performs.
The wooden bits for your sectional mast; Did you turn them on a lathe or use a hand plane like Paul?
HI Kemosabi me Tonto [sorry, couldnt resist it]
I made the joiners 350mm long and shaped them on a table saw to an octagonal shape to the largest size and then shaped them from there using a hand plane and seriously coarse sand paper until they fitted nicely
After they were glued in I waxed them with car wax I think thats the way Paul did it
I think Faze 5 deserves some credit for this also
Yes It will be interesting to see how it goes I might have to wait a couple of weeks though I need to sort out some battens from somewhere and fit some reef ties so it can be reefed also
A lot of the fun of this project is seeing how I can get the most for the least as I would like to see more people in the sport
No problem Hiko...
The Lone Ranger is used to taking a ribbing now and then!
Much of the US thinks we here in the west are just a bunch of cowboys. For the most part they're right. Still funny when they ask us questions like "do you have internet out there in Colorado"... assuming we still ride stage-coaches and get into shoot-em-ups at the local saloon.
I was told that you all drive pickups with one hand on the wheel and a beer in the other![]() and that it was legal to drink AND drive, YEEEHAH
and that it was legal to drink AND drive, YEEEHAH
That's one of the quickest ways to spend the night in jail. Plenty of people do it anyway. I don't think they would care if you rode your horse plastered, as long as you weren't running people off the sidewalk.

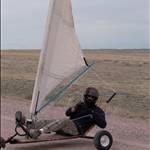
Here is the Mini rolling chassis I intend to put under the mast and sail
Stock standard Mini as far as dimensions go main spine is 52x2 exhaust tube
and a 16 inch bike wheel in front, rear axle tubes 1.6 mm ss with timber stiffener
only departures from plan [We have to use what we have]
Hope to start on the seat next week The chassis will stay in its primer paint
until after all the testing
Looks grouse Hiko.![]() Can you give us some more detail on how you did the front forks? Material, method, aligning etc
Can you give us some more detail on how you did the front forks? Material, method, aligning etc![]()
![]()
The front wheel and forks came from a bike in the skip at the local dump
I cut the original steering tube off and welded a shaped 4mm plate across the forks where the front brake used to mount and welded the new steering tube
[25x2.5 SS ] on an angle to that It has a short piece of 20 mm tube inside in the lower part
I drew out the geometry according to landyachts instructions but it took me three attempts to get it right Small errors have big effects The tube that holds the bushes is 38x2 and the bushes were machined from a chunk of pvc bar from the offcut bin at an engineering plastics outlet
The machining of the bushes was done on my drill press as I dont have a lathe
A drill press can function as a vertical lathe of sorts with a bit of thought
The build has been rather slow as matierial in small quantity was one problem
and making up my mind about the seat was another
I had lots of ideas regarding the seat but in the end decided to keep it simple
so altered the frame yet again
Have enjoyed the project so far
My mini seat under construction I used the stitch and glue method using 6mm
Meranti ply Quite splintery wood! The shape is basic slightly flared out sides
narrower than the plan and higher to give good security for children
The temporary formers are made from scraps from a kitchen factory and held with drywall screws

This is the gadget I used to hold the parts of the forks for welding
I picked up this ancient piece of weaponry some time ago in a second hand shop
for a good price as noone knew what it was
Its very good for this kind of job saves the wife from arc flash and burnt fingers
and my ears resulting thereof Holds it steadier too

nice work again. a few years ago when I was building my schooner I used some of that maranti ply , your right it was pretty bad. the gabboon was much nicer, but if you want really tough and nice to work , look out for hoop pine marine ply. its really stable and you can soak it, bend it and dry it out with the bend intact.
doesnt want to split or delaminate.
that lovely tool was the mystery item on a show called "the collectors"![]()
Talking about cushioning I had a bean bag made from parka nylon and loosely filled
with polystyrene beads in the other yacht for a while It weighed next to nothing
The big problem with it was staying awake long enough to make the turn before the deep channel at the end of the beach ![]()
![]()
The other problem was it was a bit slow getting into on our Le Mans type starts
great for tooling around though Will probably start off with that on this yacht
Quick cheap and easy
I was going to do a bean bag thing for Diablo but after checking out bean and bag prices I opted for a patio chair cushion from K-Mart for $35. It is a bit light though and if there is a decent breeze it tends to get blown out before I can get in.
I am now thinking small high density foam pads covered with vinyl and permanently fixed at the pressure points ie bum, hips and lumbar.
Parka nylon and loose poly beads are real cheap but you are right about the
blowing around and chasing it down the beach thing I sewed ties on the corners
and tied it in in the end
For cost and comfort I dont think it could be beat probably doesnt appeal to everyone though
Sorry cisco but i have to post this.......LOL
What about padded shorts? cyclists, dinghy sailors use them.
but might look interesting under Pauls "Blue Super Suit" ![]()

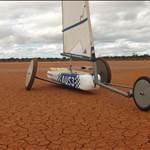
Here is my Lake lefroy mini nearly ready for its first sail
The total cost to date $440 NZ the all up weight is 34 KG
around $13/KG somewhere between pot roast and braising steak price !
Cant try it out as there is no wind and wont be for a few days by the looks
Will take the time to redo the luff of the sail as not that happy with the shape there

I think I should have pulled the sail tighter when the luff sleeve was sewn on
The weight on the front wheel is 15.2 KG with me aboard Heavier than my class 5
The stitch and glue seat weighs 6KG and was made from 6mm ply It seems very strong and possibly could have been made from 4mm ply
The sides of the seat at the rear are 150MM high and the seat is narrower than standard
The headrest is a lumbar cushion from a car accessory shop
The mainsheet as shown is too short I will need to fit a longer one
whats the go with Kiwis and Grey! is it a camouflage for those black sand beaches?
It looks like another sweet mini there Hiko![]()
I did it to wind you up[[}:)]] I thought leaving the tinkerbell transfers on the forks might be taking it a bit too far
It hasnt earnt its stripes yet ![]()
Talking of black sand beaches Auckland club have a meeting July 4/5 at Kariotahi
so that might be its first outing. Praying for wind
I made a boom fitting for my mini today I had a piece of unidirectional carbon cloth
laying around and I have always wanted to make something useful with it
The boom on my mini is quite low so getting the blocks and sheet internal seemed like a good idea I bought two 60mm sheaves from a local chandler for $5 each and designed the fitting around those

I cut piece of timber 24mm x 24mm and 300 mm long and taped it to the boom
to form the shape for the fitting and then wrapped the timber and boom with 3 layers of gladwrap film and laid one layer of woven fibreglass one layer of the carbon with the strands going over the boom two strips of carbon running along the boom where the sheave bolts are and then another layer of fibreglass cloth over all
I wet out the layup on a flat board with aprox 70mls of resin and then placed it on the boom and covered it with more gladwrap some rubber sheet and clamped it all
up in the vice and left it overnight to cure
Here is a sketch of the layout of the fitting

Today I cleaned up the fitting and inserted the aluminium cheeks and sheaves
The spacers were made from a small piece of stainless tube
here is a pic of the final setup

I tried it all on the yacht today and it looks like it will work well and is very light