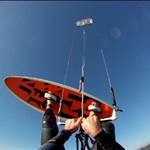
The upmarket do-it-yourself foil board
And now I know why most materials used in making that board has left a massive carbon footprint.
You guys are very clever, seriously, to work out how to make all those components, put 'em together so well , then sail them,
Hats off to you !
BTW, Cole Street ?
impressive but looks like more than just a weekend job. Also heard from a bike shop guy who cut my carbon fork stem that carbon fibre is very toxic like asbestos so a dust mask is essential for this type of work...
that was freakin awesome! Nice work, great effort, and totally worth the time. Loved the way you edited the clip. I just love the whole concept on how you put this together, the wing, the board, the clip, all top notch. Thank you so much...this is no ordinary weekend scrub build, this is the real deal here when it comes to being able to try out solid designs because you have the ability to create them for yourself. Well done....so impressed! I however would have moved my car out of the garage during the build ;)
Wow that's an impressive workshop and set of skills. Makes sence why the high end gear is so expensive.
Good christ thats a lot of work!!
Obviously you have experience in shaping and composite construction?
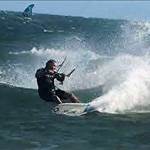
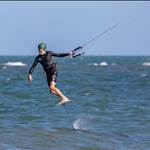
And, are you really kiting in boardies and a t-shirt in august in VIC?
Hey that's not me sadly - but Id love to have the skills and that workshop to have a go!!
There are some very talented people out there !!
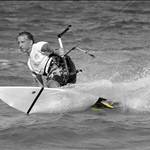
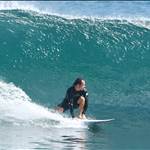
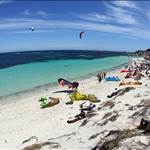
What area is that looks like a great place to foil ?.
great job,but I think I'll buy my upgrade when time comes.
After working in a car repair workshop for years as a painter, I hate the smell
of all those chemicals.
Nice work on the build, good reminder on how toxic the equipment we use is as well, better keep my boards for a few more years yet.
Wow .. Fantastic video .. I never realised how labour intensive making a carbon foil & board would be .. no wonder they cost an arm and a leg .. and maybe half a kidney :)
Thanks for posting the vid.
Loved seeing how it's all done. I've heard about that vacuum process but never really understood how it all worked. I don't care whether it's placebo or not handmade stuff works better and is special.
I was emailing with Mat the guy who did this build and this is what he said about the project
"i didn't really kept track of all that during the build...
for the time:
i started to build mid november last year, mid march the foil was finished then i made the board and i got it in the water mid-april, with some lazy moment during the foil...:)
also i did a lot of applying putty, sanding too much, adding more, sanding, adding, sanding....
basically the steps for the foil:
making the core: cutting sheets of wood, gluing them, sanding to shape. I used thin plywood as it allowed me get the rough shape without sanding, and during sanding, the lines due to the layers help a lot. Also to give the bend to the front wing during gluing. For the rear wing i gave the bent with the first carbon layup.
When the wood shape is right, i added putty ( a mix of talcum powder and epoxy resin ) to smooth all the shapes out.
After that i did the structural layup. to know how many layer, orientation and all, i relied on the forums online (kitefoil.forumactif.org in french, and kiteforum.com/viewforum.php?f=196 in english)
this was vacuum bagged to get good resin to fiber ratio to get maximum strength. (my vacuum pump was made from a car AC filling pump, some pvc tubes for a reservoir and a regulator/switch. That is made to avoid having the pump running constantly. A much cheaper version can be made with old refrigerator pump. )
it doesn't appear in the video, but after this layup cured at ambiant, i baked it at 145 degreesF for around 6 hours... i did that with a cheap electric heater, and some insulation foam.
after that i used putty to smooth out the shapes.
finally one more thin layer of carbon, mainly for the look... which was kind of useless as i painted most of it afterward...
the paint is car paint, and i cover it with some kind of vernis...
the board is like a regular surfboard accept that i added 2 pieces of wood with fiberglass to spread the load better... i'm not 100% sure that it's needed, i never saw that done on the forums...
roughly i would say 30 to 40 hours for the board (i made a regular surfboard before, that was the 2nd)
and for the foil, i would say from 100 to 150 hours... just a very rough estimation
for the tool, i already had most of them. and not all are needed. must have are a drill, cordless is fine, and a sanding thing... not 100% needed, but it helps a lot. The vacuum pump is a must have too, but you can make one for almost nothing. the drill press is very optional, i used it to control better the alignment of some holes, the blue thing that i used at the beginning of the board to cut the foam (i'm not sure about the name) is not needed, same for the electric saw... manual works just fine.
regarding the raw material, i used:
270$ of carbon, 64$ of glass, 160$ of epoxy resin (2 gallons)
vacuum supply roughly 100$
blank and fins for the board 100$
some wood, glue, ... not sure but i'd say roughly 100$
roughly 800$ in total in raw material.
carbon can be cheaper from e-bay, and i guess it's possible to use less resin (if you do less sanding)
for the design, it's a looooooot of reading of the forums i highlighted earlier. I didn't used a complete design from there (there are a few) instead i picked what i thought was good:
- i did a short mast (80 cm) as where i ride the water's not very deep, i also thought that it will be easier to learn.
- the surface of the wings is inspired from the forums , their outline is kind of random, mainly aiming at looking good. Bend is kind of random too :)
- the wings profil is hand shaped (flat bottom, wing shaped top) to provide good lift without needing to give to much angle. they are a bit thick to keep surface are and keep the foil from accelerating too much (i was planning on making thiner ones later)
- the fuselage is very random, with vertical fin integrated in the shape at the back, but i start to think that it's redundant with the bend in the wings.
- the mast profile is a bit random, thickness is around 16mm which is a bit on the tick side.. but it helps for stiffness. i'm starting to think that i should have the front of the mast less bulky. I gave it a symmetrical wing shape, but as it doesn't need lift, a blade shape would be better.
so the shape is mine... with lot of hints from the forums... :) lot of thing were tried and i read a few time that basically anything can fly... :)
only tuning that was needed was to adjust a bit the rear wing angle... that purely based on feeling.
the bottom of the front wing is parallel to the board.
i used regular plywood, i thought it would be fine as it's fully covered by fiber and resin... for the screw hole, i made them larger, filled up with resin and drill again for the screw. however, that might not have been a smart idea... the front wing split on the leading edge almost all along, i guess the structural layup i did didn't help too... one layer to and bottom, not one continuous wrapping the leading edge...
i thing i hit the bottom, it stressed the screw whole and let water in, then the wood expanded.
due to a few other reason below, i didn't try to repair it.
this first try helped me a lot to find the weak points:
- where the mast meet the mounting plate at the top, it did split a bit the first time i used it, i reinforced and no other problem after.
- the fuselage was weak at the front and where it meets the mast... the side of the mast box are too thin, they didn't handle running the foil into the ground hard while riding. i did the repair twice, each time it held well for a few session until the next big crash.
- finally the tread inserts for the front wing started to come out, i guess due to the same crash that killed the wing... water got in and wood started to expand.
as the wing and the front of the fuselage are pretty much trashed, instead of making new ones, i'm building a full new foil.
for the new one, i'm making mold, and i plan on embedding the inserts during the molding. i got half the mold done. i might do another video when it's finished.
i hope that helps , let me know if you have more questions"
I've thought long and hard about building a hydrofoil. I have the equipment and skill. Hell i even have enough carbon lurking to build it.
But dang. The thing I lack is time. There's a flying sjhit tonne of time thrown into that build.
One day i'll pull finger and give it a shot.....