12:53 AM Sat 8 Aug 2009 GMT

|
|
'Making cruising cruisier'
.
|
Sure, sailing should be challenging - that's a great part of the appeal of it. But it should also be fun and not too stressful (after all, isn't that why we sail - to reduce stress?).
In other words, why make things harder than they are? I'm a great believer in making things as easy as possible for everyone on a boat, whether skipper or crew, so that a day or week or a month or a year on a boat is as stress-free as you can make it - meaning more opportunities to relax and enjoy the sailing.
These tips range from free to a couple of thousand dollars. They have all been aimed at making our sailing life simpler, easier and less stressful, as well as letting us do some tasks more quickly.
Many of these things are of course standard on more modern production boats, but there's still a lot of older boats around where I reckon the owners could make life a lot easier for themselves.
1. Use a checklist.

|
|
Tip 1 checklist002 web - .. .
|
After forgetting a few important things on our previous boat, a trailer-sailer - like hooking up the trailer lights, or actually tying the boat down to the trailer - we developed a simple checklist, covering the things to do before leaving home, before launching, and before leaving the ramp. It was a laminated sheet of A4 paper which sat in the car, and we just got in the habit of referring to it each time.
We now have the same thing with our yacht - especially when it's time to pack up and go home. It includes things like ensuring the seacocks are closed, battery disconnected and hatches closed and locked.
Cost: free
Advantages: No waking up at 3 am as the rain starts, thinking 'did I close that forward hatch?'
2. Frequent-use shackles: use captive pin shackles:

|
|
Tip 2 captive pin shackles 004 web - .. .
|
If you have any shackles you have to attach each time you get on the boat, don't muck around undoing/doing up the pins; replace them with captive pin shackles (halyard types). Much much quicker, and you don't risk dropping anything overboard.
Cost: $10-$20 a shackle, depending on size.
Advantages: Quicker, easier, no need to find a shackle tool, no risk of losing shackle bits overboard.
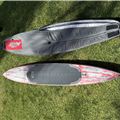
3. Halyard/sail connection: throw away your shackle!

|
|
Tip 3 halyard connection 002 web - .. .
|
We recently replaced our wire main halyard with a Spectra halyard (see picture). We also used the opportunity to do away with the captive pin shackle we had previously, and opt for an unusual stopper knot system.
Why? The standard combination of captive halyard shackle and wire rope eye meant our sail was a touch too high for our mast, and we could never get it as tight up the luff as we would have liked.
When we put in the Spectra halyard, we put a hefty stopper knot at the end of the halyard, then we loop the halyard through a squat bow shackle in the headboard and catch it back in the stopper knot.
If we'd opted for 6 mm Spectra halyard instead of 8 mm (but harder on the hands), we could have dispensed with the bow shackle and looped the halyard directly through the eye at the top of the headboard.
We find this system is also quicker than a bowline, and less likely to come undone.
A word of caution: You'll need to double-check the knot is hefty enough not to fit through the mast sheave if you ever forget to properly hook up the sail - otherwise you'll be up for rethreading the whole thing again.
Cost: free, unless you need to buy an $8-10 bow shackle.
Advantages: Quicker to connect than a halyard shackle or bowline, self-tightening, removes 25-50 mm of fitting at the top of the sail, allowing a tighter luff using the halyard.
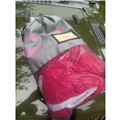
4. Use a 'dutch shackle' to attach your jibsheets to the clew:

|
|
Tip 4 dutch shackles 006 web - .. .
|
This is an alternative to using either bowlines for your jibsheets (which produce a fat knot, and are prone to coming undone if the jib flaps around a lot) or a snap shackle (which is dangerous - I've seen someone nearly lose an eye with an out-of-control hunk of metal flying around - and prone to coming undone around shrouds.
It's also an alternative to some very very expensive quick-release shackles for racing yachts designed to overcome the safety and reliability issues.
A dutch shackle is a simple length of rope (a spare length of 6 mm Spectra is excellent for this) doubled over and whipped together, leaving an eye in the middle section, and with a stopper knot at the end. Splice your two jibsheets (port and starbord) to leave a small eye at the ends (go on, learn to splice braided rope, it's fun!) and feed the dutch shackle through the eyes in the sheets.
You then just feed the eye end of the dutch shackle through your clew eye and loop it over the stopper knot. It's self-tightening and won't let you down - unlike bowlines and snap shackles.
Note: Like any piece of line that's subject to fairly high forces and a lot of friction (as it passes around the shrouds each time we tack), the dutch shackle and splices should be checked every so often for wear.
Cost: free, assuming you can whip and splice. A rigger will do a splice for around $20-40.
Advantages: Reliable (self-tightening), much smaller profile than either two bowlines or a hefty snap-shackle, so is much less prone to hooking up on the shrouds when tacking or gibing. Safer, as there is no hunk of metal flying around at face level if someone's up the front dealing with a wildly flapping jib.
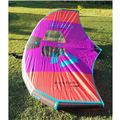
5. Bring control lines back to the cockpit:

|
|
Tip 5 control lines back 007 web - .. .
|
OK, this is starting to get a bit more labour-intensive, and will cost you a bit of money. In my view, it's worth it. Particularly if you have an older boat, you may well have lot of important lines ending at the mast: things like halyards, reefing lines, topping lift, boom vang, whisker pole topper, etc. That was certainly the case on our Compass 28 when we bought it three years ago.
Bring everything back to the cockpit, and life will be a whole lot easier (and safer, in my opinion)!
At the time of purchase, our boat required new rigging, so we got the rigger to remove the halyard winches from the mast, and lengthen the lines to allow them to come back to the cockpit.
I refitted the winches on the cabin top, and installed rope clutches to handle the main halyard, spinnaker halyard, reefing lines and cunningham.
More recently, I've also brought back the topping lift and whisker pole topper, requiring a couple more rope clutches, and the addition of two deck organisers.
This hasn't completely eliminated the need to go forward, but it means the person up front isn't trying to do two or three different jobs at the same time, and the person in the cockpit can help out tailing lines, freeing clutches at the right time, etc.
All reefing can now be done entirely in the cockpit, as can adjusting the topping lift.
The main can be raised and lowered from the cockpit (especially when single-handed), though we usually find it easier and quicker to have someone at the mast to help feed it up and down.
Setting the whisker pole no longer requires someone with three arms.
Note: If you have to send someone up the mast, don't ever rely on rope clutches alone to hold them safely; cleat the lines off (always have them on at least two halyards) on a horn cleat.
Cost: Will vary, depending on whether some lines need lengthening, removal of winches, etc. We used second-hand rope clutches at around $40 apiece, deck organisers are another $30-40. A fair bit of time in ensuring winches, clutches, organisers, etc are firmly attached to the coachhouse roof, and sealed.
Advantages: Much less scrabbling around at the mast, where often two hands are required to carry out the task. Safer, more comfortable.
Watch out in Sail-World Cruising for more tips for cruisier cruising from Mark Cherrington
by Mark Cherrington
Click on thumbnails to enlarge and find more photos:


|